3.4 案例 3:开发 HeyBeauty MCP,在线虚拟试衣
在前面的 MCP 服务器开发案例中,我们主要是在 MCP 服务器接收文本输入,再通过工具调用返回文本内容给客户端展示。
本节内容,我们计划开发一个图片处理类型的 MCP 服务器,通过一个虚拟试衣的例子,演示如何接收客户端发送的图片,处理之后返回图片给客户端。
3.4.1 介绍 HeyBeauty 虚拟试衣
去年 4 月,我开发了一个叫做 HeyBeauty 的产品(heybeauty.ai),核心功能是让用户在网页端上传一张自己的照片,和一张想要试穿的衣服图片,HeyBeauty 通过自研的试衣模型,生成用户试穿衣服后的效果图。
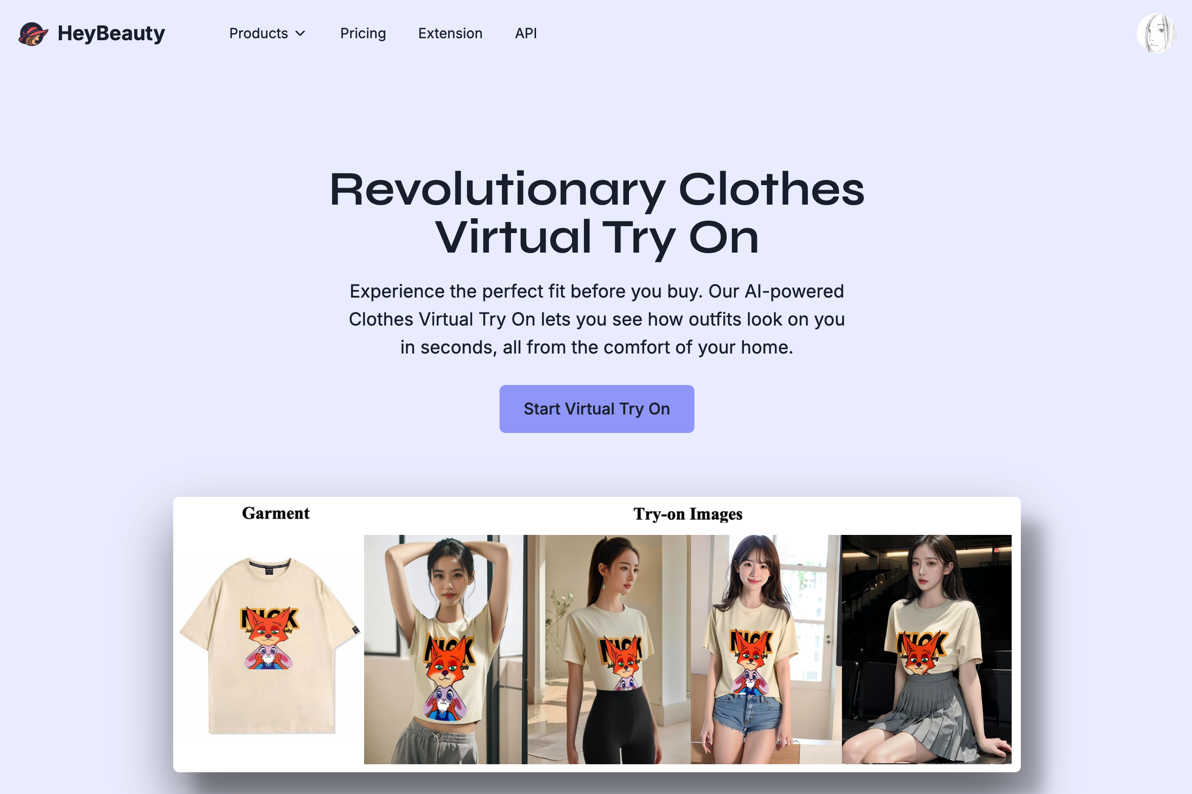
图:HeyBeauty 产品官网
用户试衣的流程为:
- 用户打开网页,进入 HeyBeauty 试衣控制台
- 用户上传一张自己的照片(User Image),和一张想要试穿的衣服图片(Cloth Image)
- 用户提交试衣任务(Submit Task),HeyBeauty 开始识别图片运行试衣程序
- 用户查看试衣结果(Query Task)

图:HeyBeauty 试衣控制台
为了让更多人用上 HeyBeauty 的试衣功能,我们开放了 API,允许第三方应用接入 API,帮助用户在更多终端场景进行虚拟试衣。
在过去一年,HeyBeauty 对接的终端应用有微信小程序、移动 App、Shopify 插件、硬件试衣镜等,都在不同的场景,为用户提供了虚拟试衣的功能。
随着 AI 技术的发展与普及,越来越多的用户习惯于通过对话的形式,在 ChatBot 软件问问题、生成图片等。
所以本节的内容,我们希望能为 HeyBeauty 开发一个虚拟试衣的 MCP 服务器,接入大模型客户端,让用户通过对话的方式快速完成试衣需求。
3.4.2 HeyBeauty MCP 服务器开发思路
在开发 HeyBeauty MCP 服务器之前,我们先熟悉一下 HeyBeauty 开放的接口。
在 HeyBeauty 接口文档(doc.heybeauty.ai)可以看到,HeyBeauty 开放了虚拟试衣接口(Try-On API),使用方式为:
- 在 HeyBeauty 平台申请一个 apikey
- 请求接口创建试衣任务(Create Try-On Task)
- 上传试衣任务需要用到的图片(Upload Images)
- 查询试衣结果(Query Try-On Result)
HeyBeauty 接口文档如图所示:
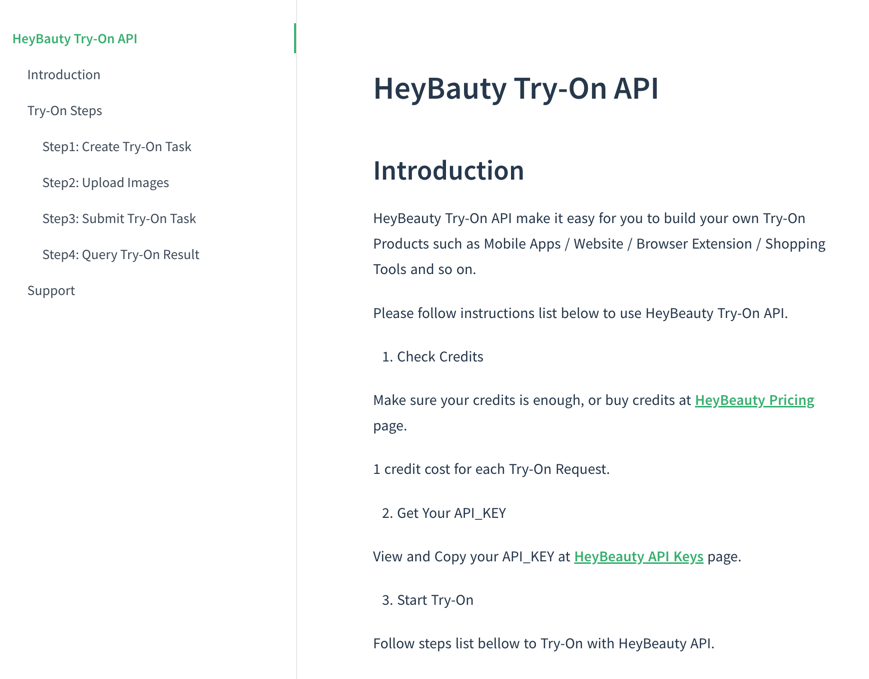
图:HeyBeauty 试衣接口文档
申请 apikey 的流程不做过多阐述,在 HeyBeauty 官网自助申请即可。
根据 HeyBeauty 接口文档的试衣流程,我们先来梳理一下接下来要开发的 HeyBeauty MCP 服务器,用户侧的主要交互流程:
- 大模型客户端在启动时,请求 HeyBeauty MCP 服务器,拿到一批衣服图片,提供给用户选择
- 用户选择其中一张衣服图片进行试衣,上传自己的照片
- 大模型客户端上传用户照片,得到两个图片地址(User Image Url 和 Cloth Image Url)
- 大模型客户端请求大模型选择可以实现试衣需求的工具
- 大模型客户端根据大模型返回的工具和参数,请求 HeyBeauty MCP 服务器,发送两个图片地址
- HeyBeauty MCP 服务器请求 HeyBeauty 接口,提交试衣任务
- 大模型客户端请求 HeyBeauty MCP 服务器查询试衣结果
其中第 2 步,用户可以不选择 MCP 服务器返回的衣服图片,而是主动发送衣服图片,这样第 3 步,大模型客户端就需要同时上传用户照片和衣服图片,得到两个图片地址。
整个交互流程中,大模型客户端必须要实现图片转换的逻辑。也就是用户发送的图片,不能直接发送源文件(图片二进制内容)给大模型或者给 MCP 服务器。而是应该上传图片到第三方图床,得到图片的 URL 地址。
虽然按照 MCP 协议的约定,客户端可以把图片的内容以 base64 编码的方式传给 MCP 服务器,也可以接收 MCP 服务器返回的 base64 编码的图片内容。但是客户端发起请求到哪个 MCP 服务器,传递什么参数,是由大模型进行调度的,也就是说需要先把图片传给大模型,大模型再告诉客户端,应该调用试衣的 MCP 服务器和需要请求的图片内容。如果这个过程,图片都是以 base64 的格式进行传递,会很消耗 token,造成不必要的成本浪费,而且有可能出现传输过程中数据丢失导致图片解析异常的问题。
搞明白这个逻辑之后,在开发 HeyBeauty MCP 服务器时,我们就不在服务器的逻辑里面做图片格式转换了,HeyMCP 服务器涉及到图片处理的地方,都使用图片的 URL 地址,而不是 base64 编码的图片内容。
接下来,我们就来实现这个试衣的 MCP 服务器。
3.4.3 创建 HeyBeauty MCP 服务器
- 创建 HeyBeauty MCP 项目
跟前面的几个案例一样,我们先通过 MCP 官方发布的这个命令行工具来创建要开发的 MCP 服务器,取名叫做:heybeauty-mcp
npx @modelcontextprotocol/create-server heybeauty-mcp进入项目根目录,安装项目依赖,启动监听服务:
npm installnpm run watch通过命令行创建 HeyBeauty MCP 服务器并启动监听程序,如图所示:

图:通过命令行创建 MCP 服务器
- 启动调试面板
为了在开发过程中,调试 MCP 服务器内部的逻辑,我们需要启动调试面板。
通过 MCP 协议官方开发的命令行工具,在 HeyBeauty MCP 服务器根目录启动调试面板:
npx @modelcontextprotocol/inspector build/index.js点击上述命令运行成功后输出的调试面板地址,进入 MCP 服务器调试面板,如图所示:
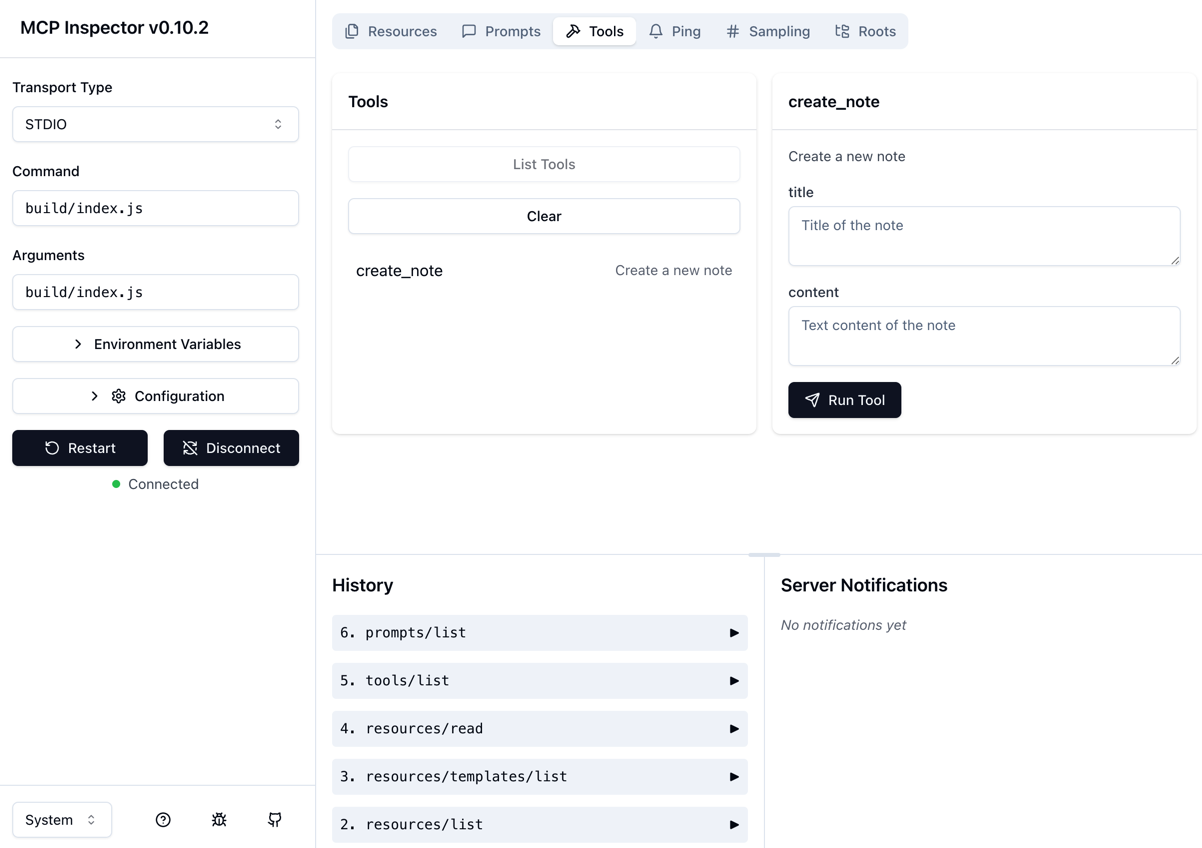
图:MCP 服务器调试面板
可以看到,用命令行工具创建的 HeyBeauty MCP 服务器,默认实现了 Resources、Prompts 和 Tools 能力。
接下来,我们就开始在 HeyBeauty MCP 服务器实现虚拟试衣相关的功能。
3.4.4 实现 HeyBeauty MCP 业务逻辑
- 我们先来实现一个调用 HeyBeauty API 的客户端类
创建文件:src/heybeauty.ts,写入下面的逻辑:
/** * HeyBeauty API Client * request apis from heybeauty.ai */export class HeyBeautyClient {  private readonly apiBaseUrl: string = "https://heybeauty.ai/api";  private readonly apiKey: string;
  /**   * constructor   * @param apiKey - api key applied from heybeauty.ai   * @param apiBaseUrl - api base url   */  constructor({ apiKey, apiBaseUrl }: { apiKey: string; apiBaseUrl?: string }) {    this.apiKey = apiKey;    this.apiBaseUrl = apiBaseUrl || this.apiBaseUrl;  }
  /**   * get clothes for try on   * @returns clothes   */  async getClothes() {    try {      const req = {        page: 1,        limit: 10,      };      const resp = await fetch(`${this.apiBaseUrl}/get-clothes`, {        method: "POST",        headers: {          Authorization: `Bearer ${this.apiKey}`,        },        body: JSON.stringify(req),      });
      if (!resp.ok) {        throw new Error("request failed with status " + resp.status);      }
      const { code, message, data } = await resp.json();      if (code !== 0) {        throw new Error(message);      }
      return data;    } catch (error) {      throw error;    }  }}
在这个客户端类里面,实现一个 getClothes 方法,用于请求 HeyBeauty 的 get-clothes 接口,获取一批可以用于虚拟试穿的衣服图片。
- 调试客户端类,调用
getClothes方法
在 src/index.ts 服务启动的函数里面,创建 HeyBeauty 客户端类进行测试:
/** * Start the server using stdio transport. * This allows the server to communicate via standard input/output streams. */async function main() {  const apiKey = "xxxxxx";  const client = new HeyBeautyClient({ apiKey });  const clothes = await client.getClothes();  console.log(clothes);
  const transport = new StdioServerTransport();  await server.connect(transport);}
main().catch((error) => { console.error("Server error:", error); process.exit(1);});打开终端,运行:node build/index.js 命令,可以看到在 main 函数调用客户端获取 HeyBeauty 衣服列表的结果。我们主要关心这几个数据字段:
- title:衣服的名称
- description:衣服的描述信息
- cloth_id:衣服的编号
- cloth_img_url:衣服的图片地址

- 实现获取资源列表的逻辑
修改 src/index.ts 中获取资源列表的逻辑,传入 apiKey 创建 HeyBeautyClient,把调用 getClothes 得到的衣服列表作为 MCP 服务器的资源列表(Resources)返回。
/** * Handler for listing available clothes as resources. * Each cloth is exposed as a resource with: * - A cloth:// URI scheme * - Plain text MIME type * - Human readable name and description (now including the cloth title) */server.setRequestHandler(ListResourcesRequestSchema, async () => {  try {    const apiKey = "cb829660-beed-4ba9-b6c2-f9236a38a6c5";    const client = new HeyBeautyClient({ apiKey });
    const clothes = await client.getClothes();
    return {      resources: clothes.map((clothe: any) => ({        uri: `cloth:///${clothe.cloth_id}`,        mimeType: "text/plain",        name: clothe.title,        description: `${clothe.description}`,      })),    };  } catch (error: any) {    throw new Error("get resources failed: " + error.message);  }});
在调试面板请求 List Resources 方法,得到服务器返回的资源列表,如图所示:
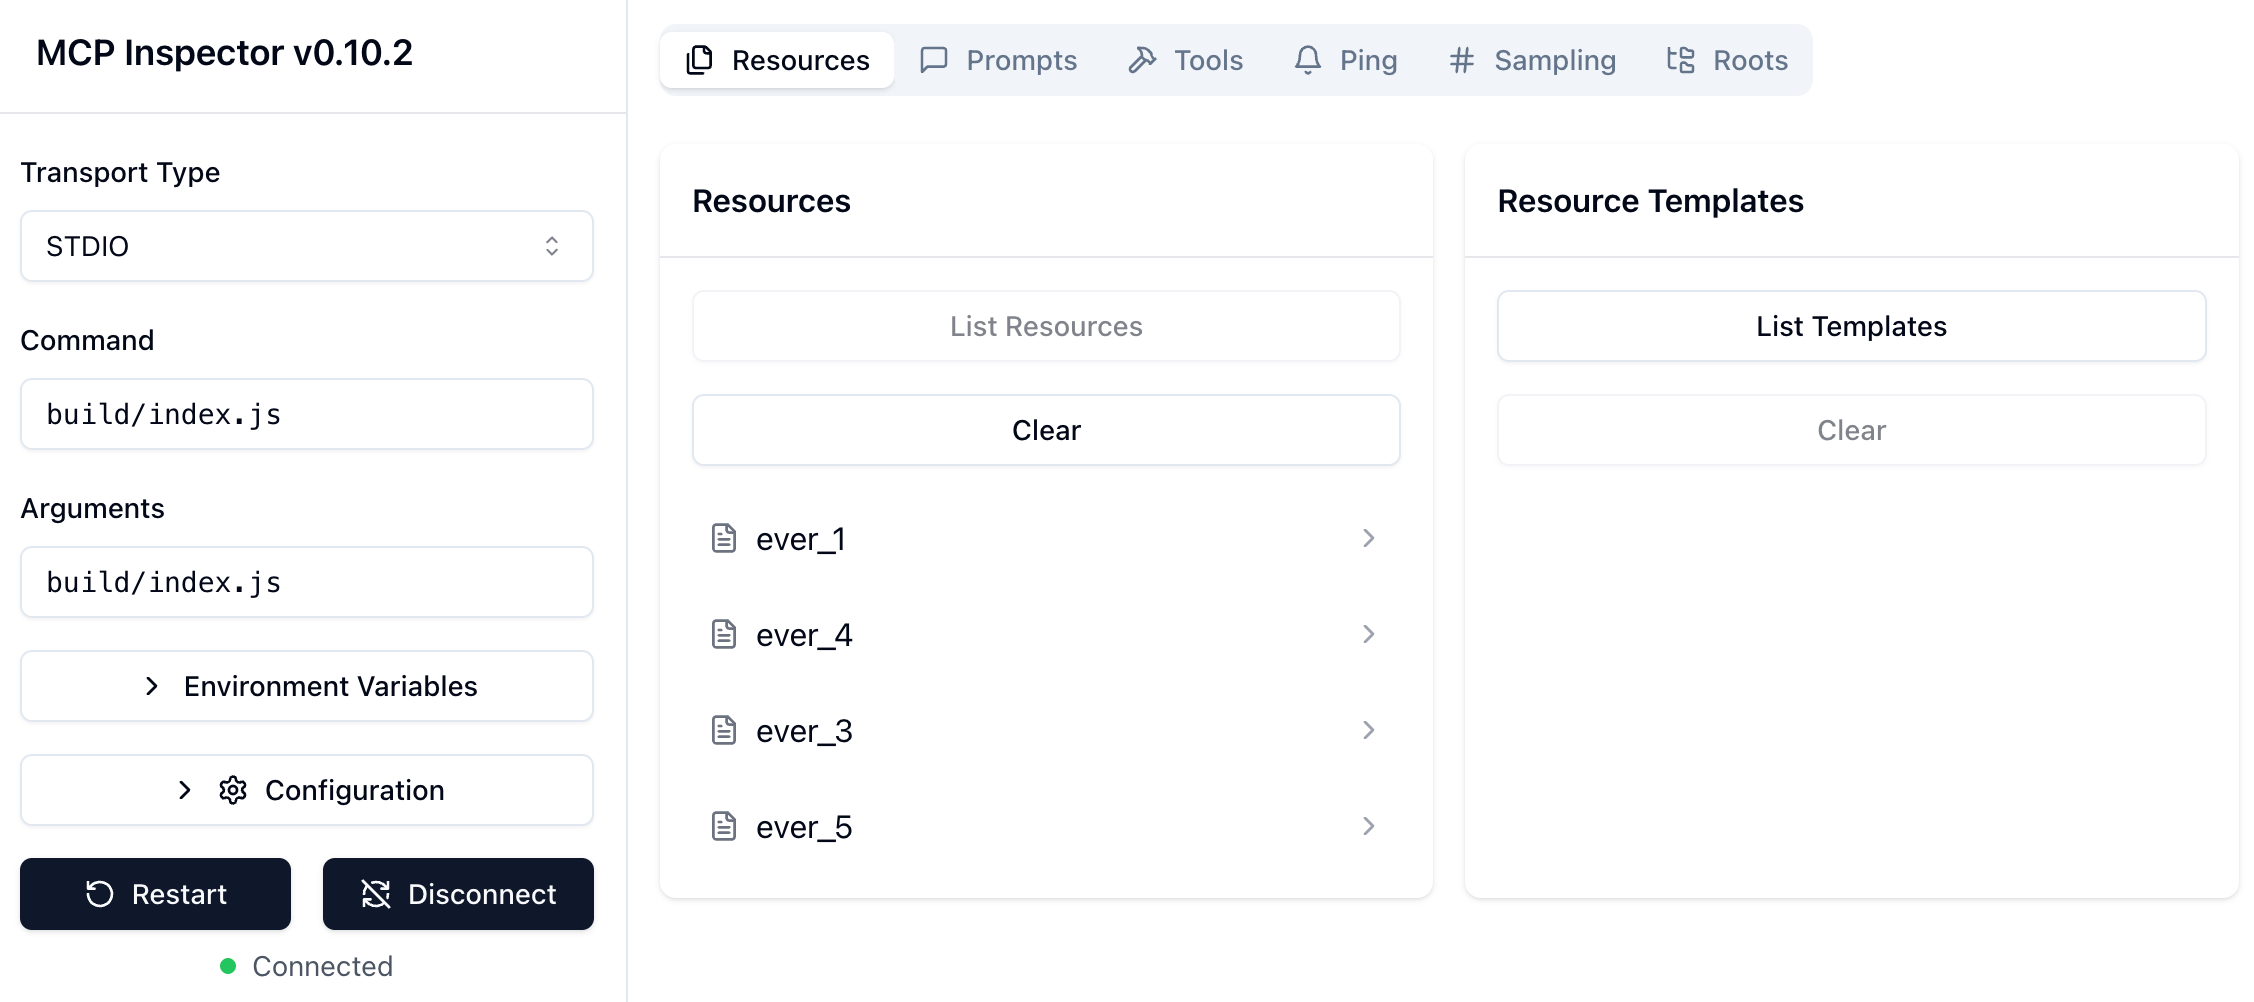
图:调试获取资源列表
- 实现读取资源的逻辑
修改 src/index.ts 中读取资源内容的逻辑,传入 apiKey 创建 HeyBeautyClient,调用 getClothes 得到衣服列表,再根据请求的衣服 ID,获取对应衣服的图片地址。
/** * Handler for reading the contents of a specific cloth. * Takes a cloth:// URI and returns the cloth content as plain text. *//** * Handler for reading the contents of a specific cloth. * Takes a cloth:// URI and returns the cloth content as plain text. */server.setRequestHandler(ReadResourceRequestSchema, async (request) => {  try {    const url = new URL(request.params.uri);    const id = url.pathname.replace(/^\//, "");
    const apiKey = "cb829660-beed-4ba9-b6c2-f9236a38a6c5";    const client = new HeyBeautyClient({ apiKey });
    const clothes = await client.getClothes();
    const cloth = clothes.find((clothe: any) => clothe.cloth_id == id);
    if (!cloth) {      throw new Error(`Cloth ${id} not found`);    }
    return {      contents: [        {          uri: request.params.uri,          mimeType: "text/plain",          text: cloth.cloth_img_url,        },      ],    };  } catch (error: any) {    throw new Error("read resource failed: " + error.message);  }});
在调试面板,选择 List Resource 返回的其中一个资源,触发 Read Resource 的请求,可以看到服务器返回的资源内容,如图所示:
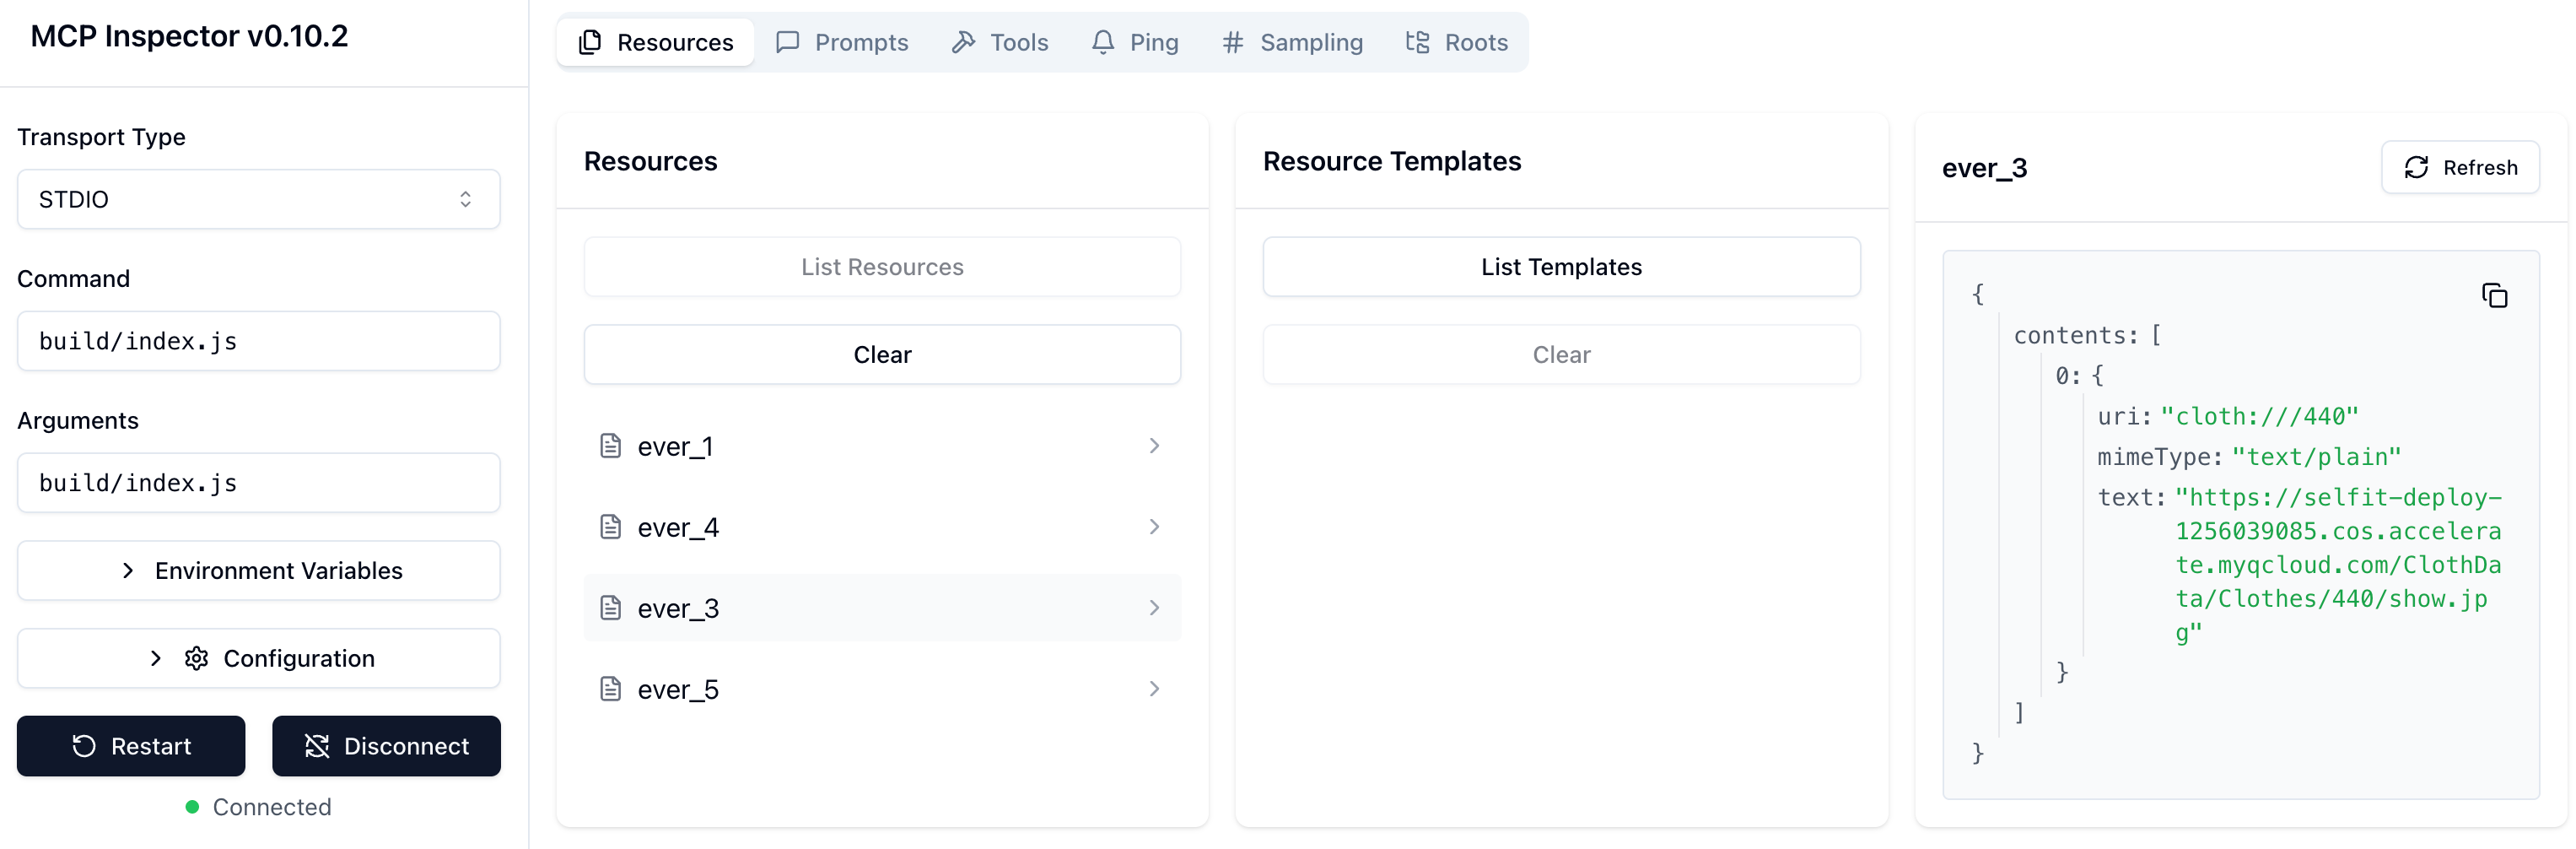
图:调试面板读取资源
- 在大模型客户端调试资源
调试面板获取资源列表和读取资源都调试没问题。我们再在大模型客户端继续调试,看看服务器暴露的资源在大模型客户端可以如何使用。
在 Claude 配置 HeyBeauty MCP 服务器:
{ "mcpServers": { "heybeauty-mcp": { "command": "node", "args": [ "/Users/idoubi/code/all-in-aigc/chatmcp/heybeauty-mcp/build/index.js" ], "env": { "HEYBEAUTY_API_KEY": "xxx" } } }}运行以下命令监听 Claude 客户端的输出日志:
tail -f ~/Library/Logs/Claude/mcp*.log启动 Claude 客户端,日志输出的内容显示,客户端给 HeyBeauty MCP 服务器发送了 resource/list 请求,获得了 MCP 服务器返回的资源列表,如图所示:
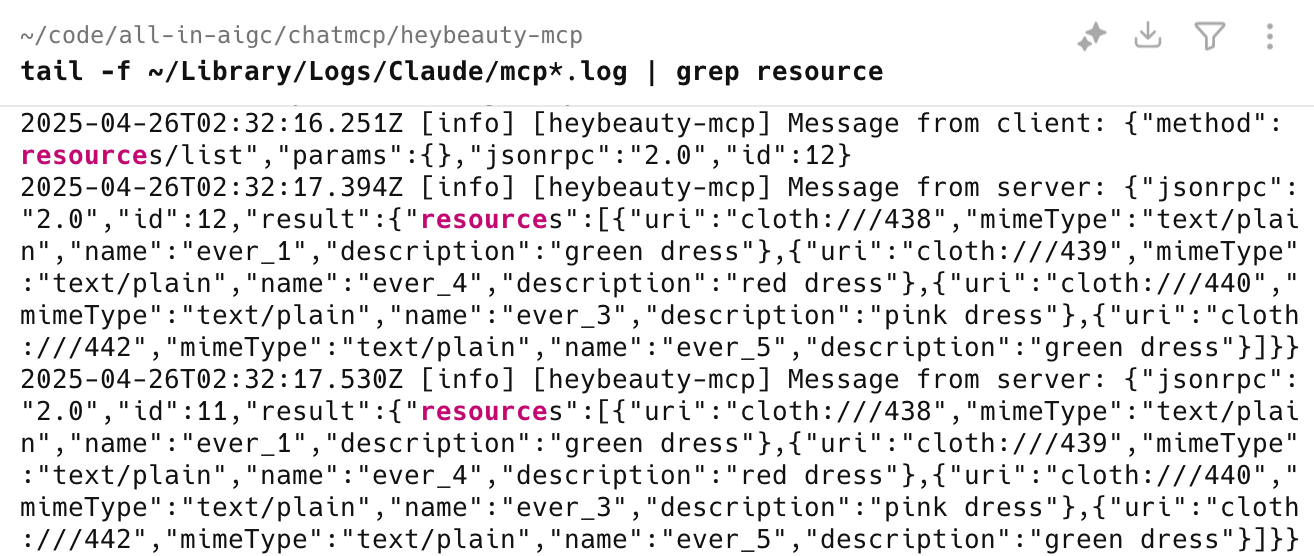
图:Claude 客户端读取 MCP 服务器资源列表日志
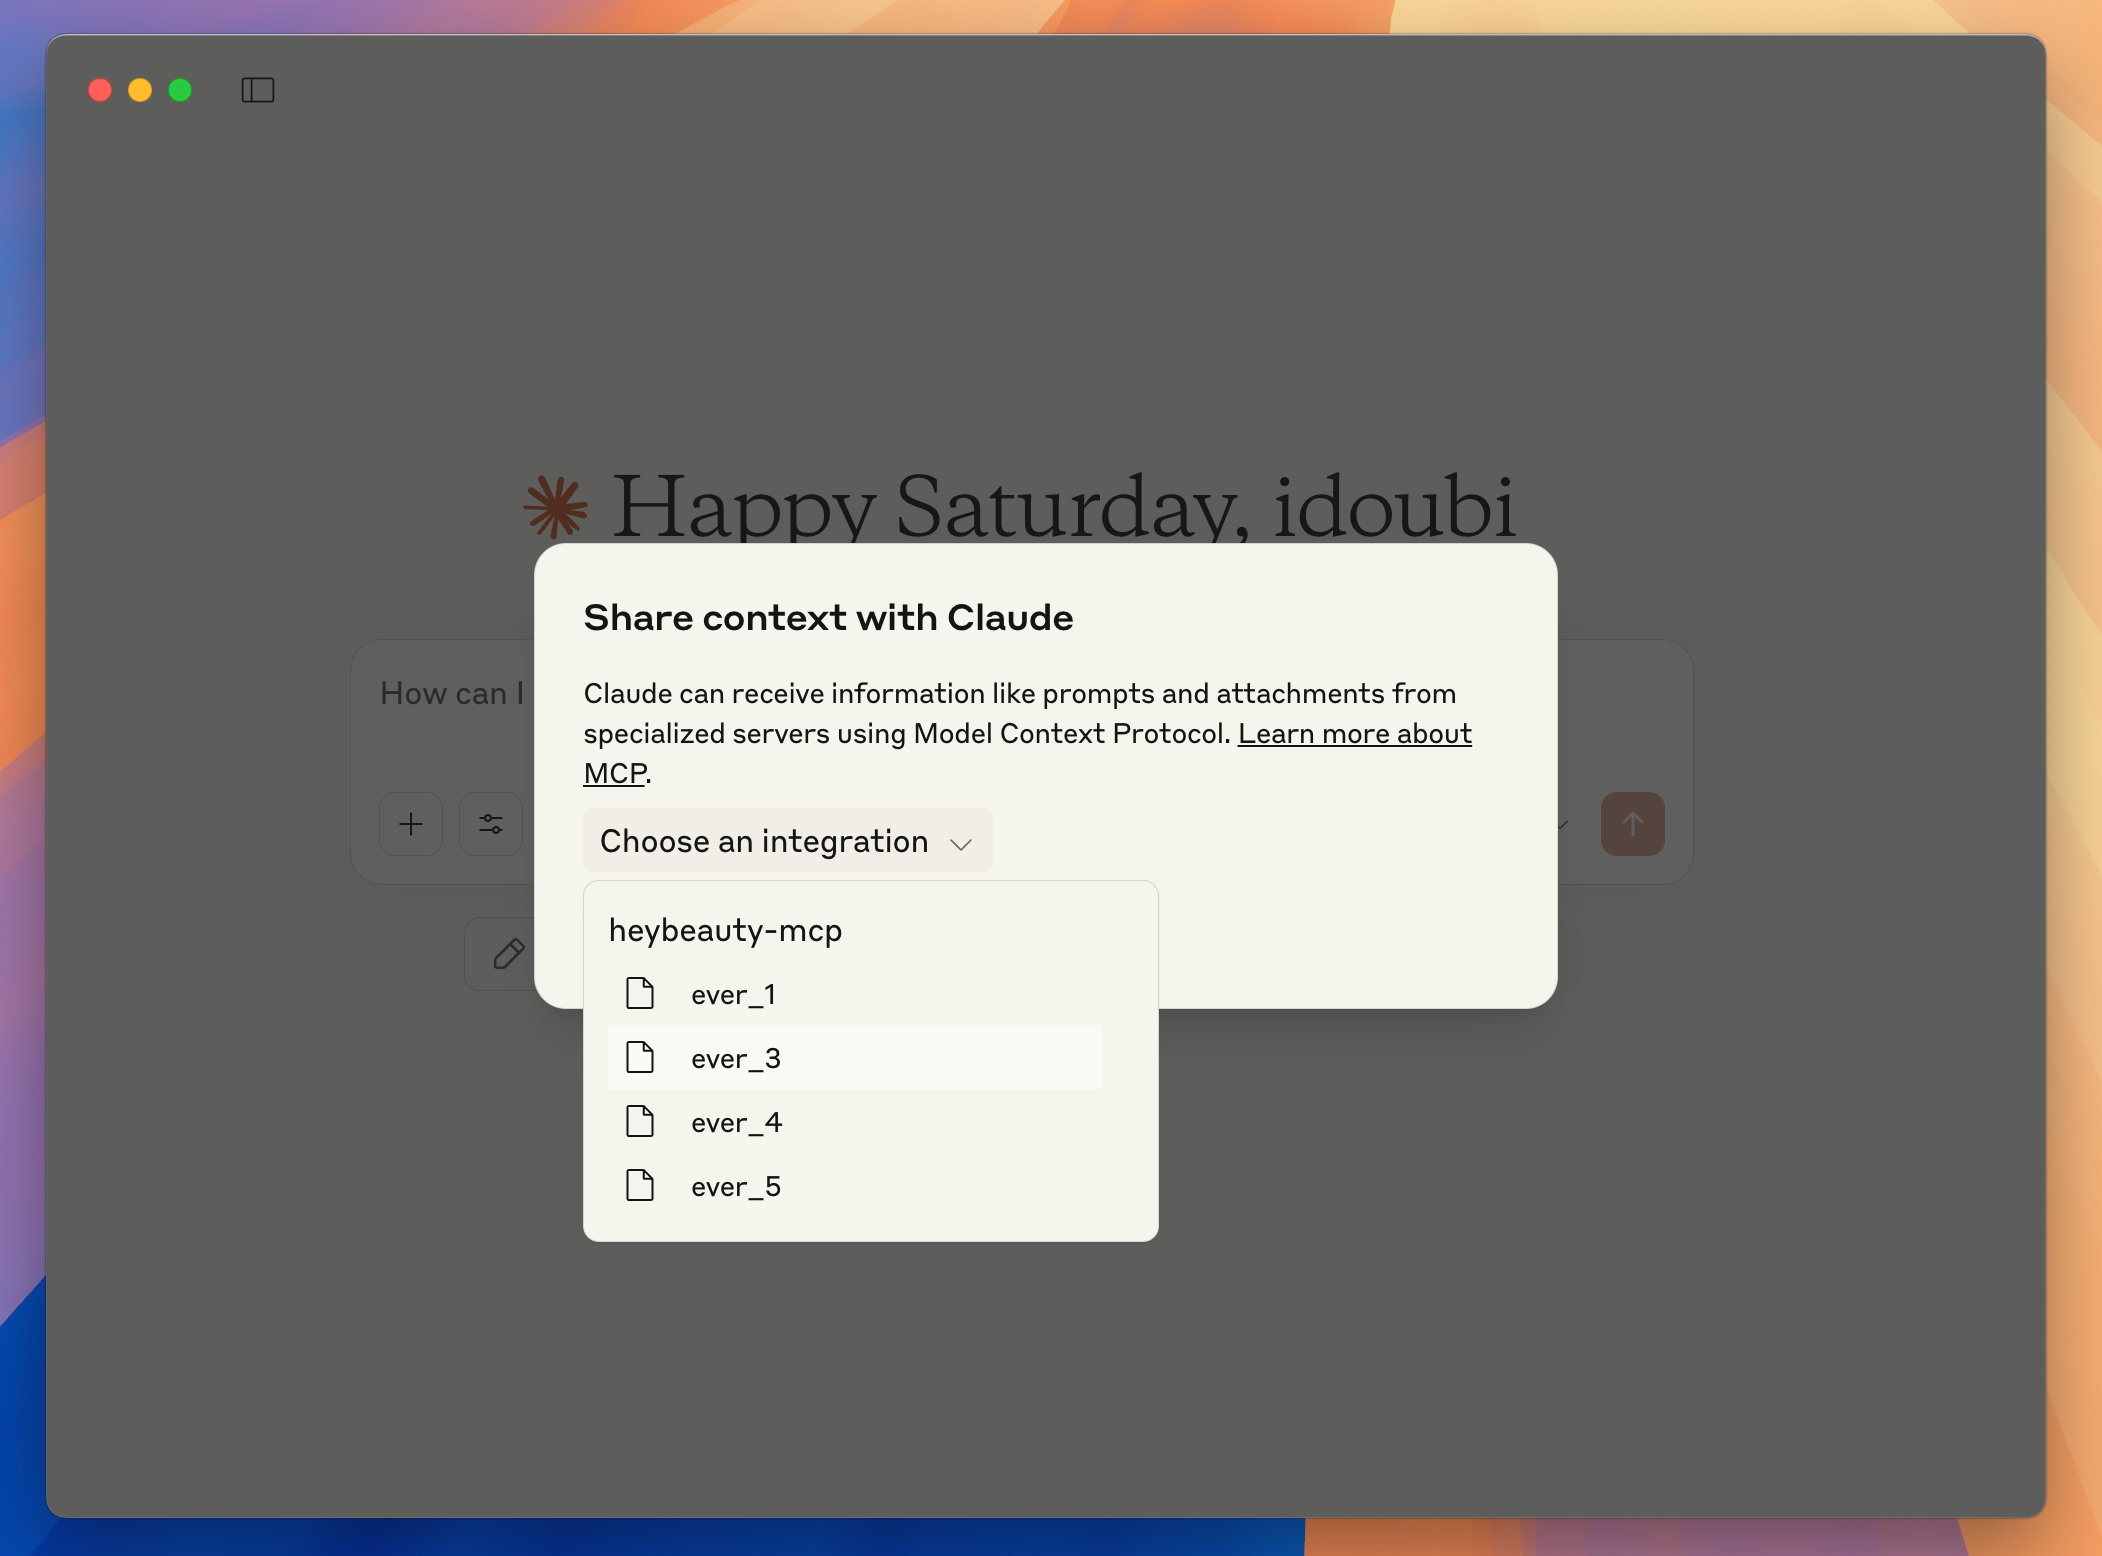
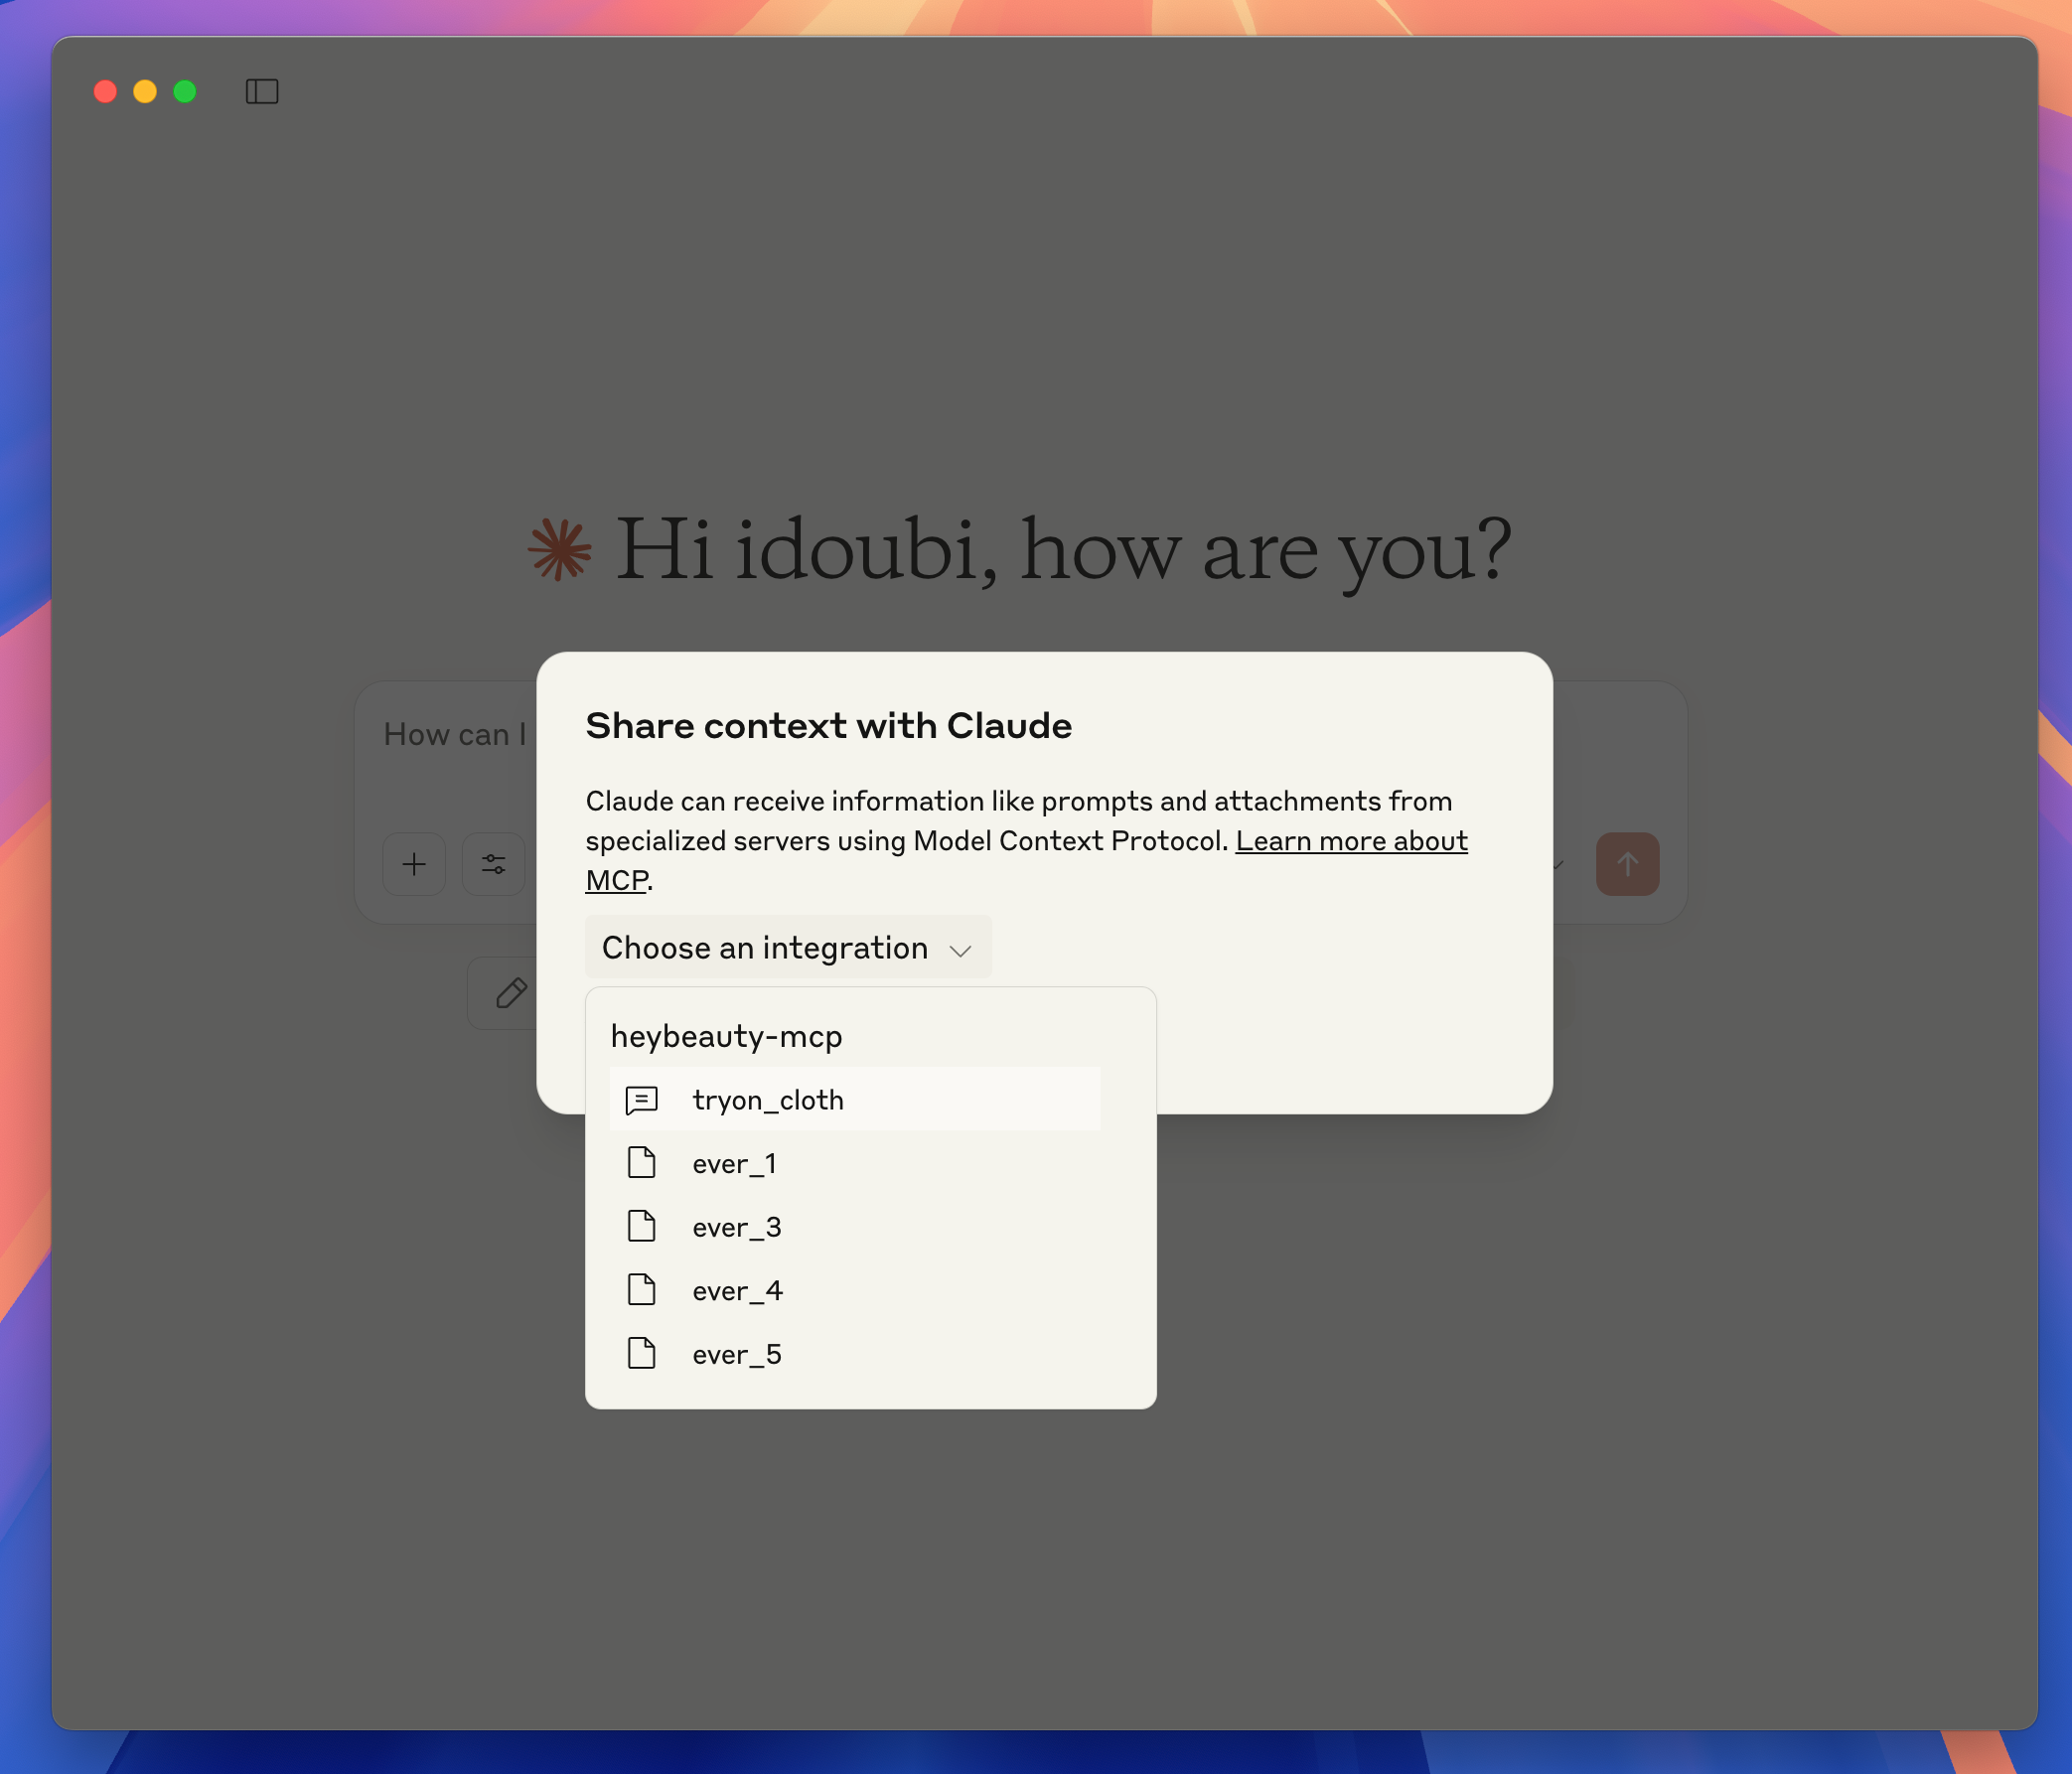
用户在 Claude 客户端点输入框最右侧的图标,可以看到 HeyBeauty MCP 服务器返回的资源列表(即支持试穿的衣服列表)
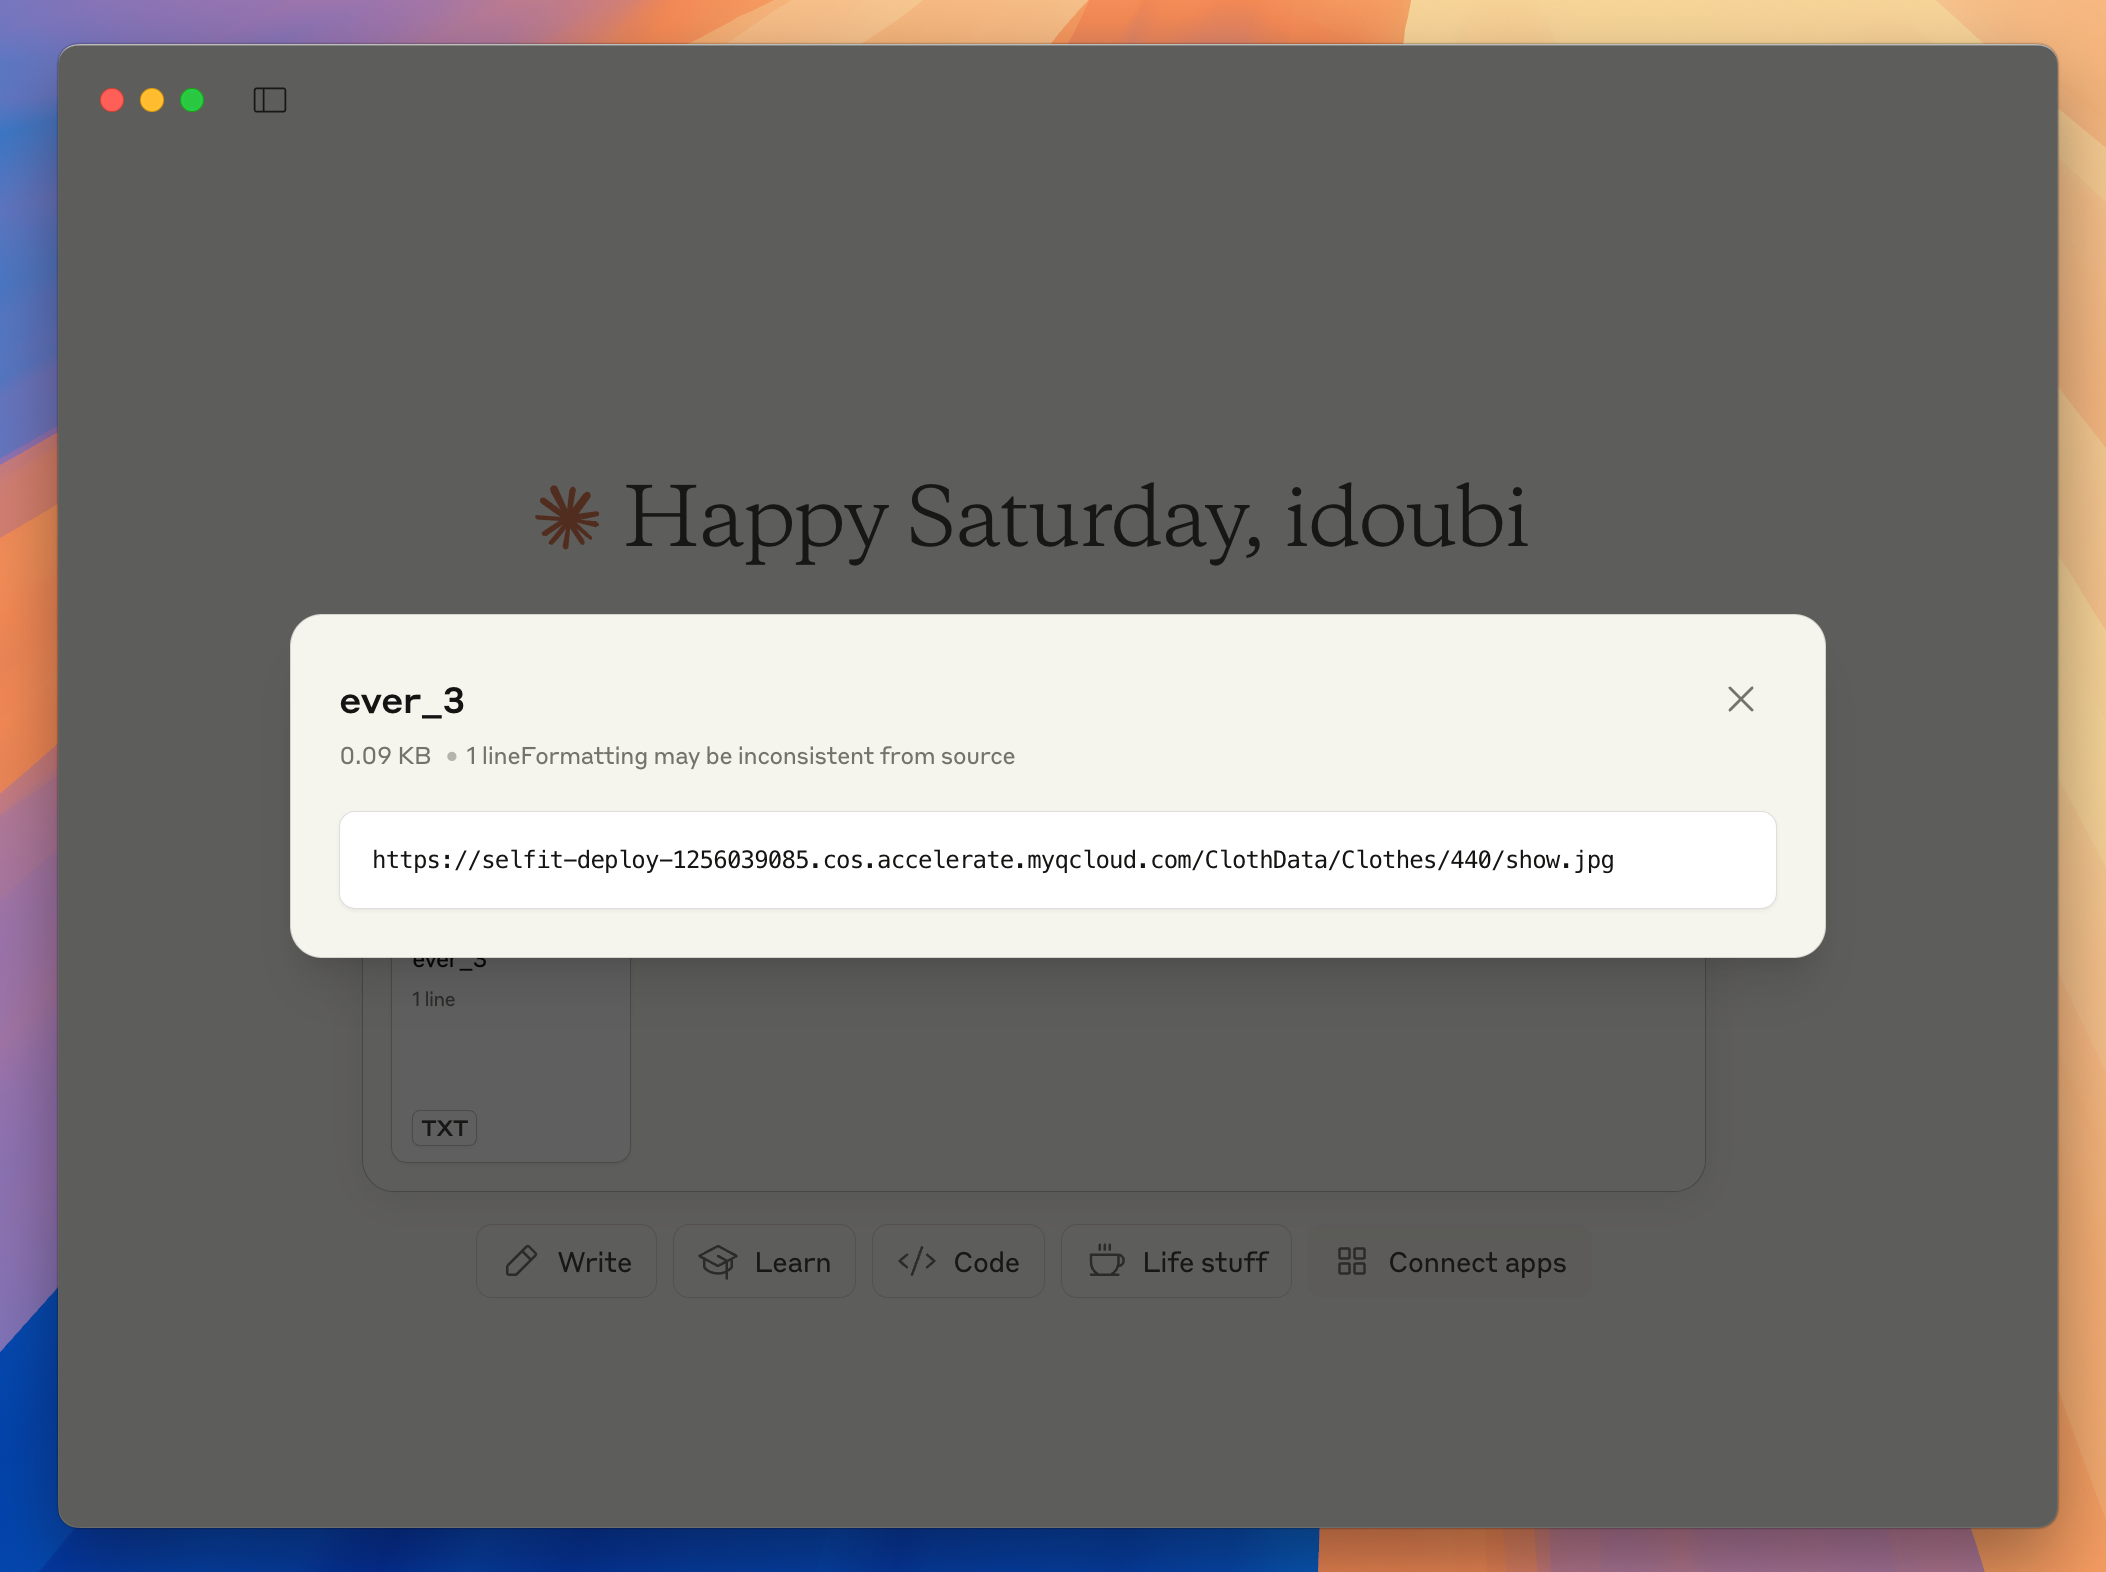
用户点击选择其中一个资源,比如(ever_3),通过 Claude 客户端输出日志可以看到,客户端给 HeyBeauty MCP 服务器发送了 resources/read 请求,传递的参数是资源的 ID(即 cloth_id),HeyBeauty MCP 服务器返回了资源的内容(即衣服的图片地址)
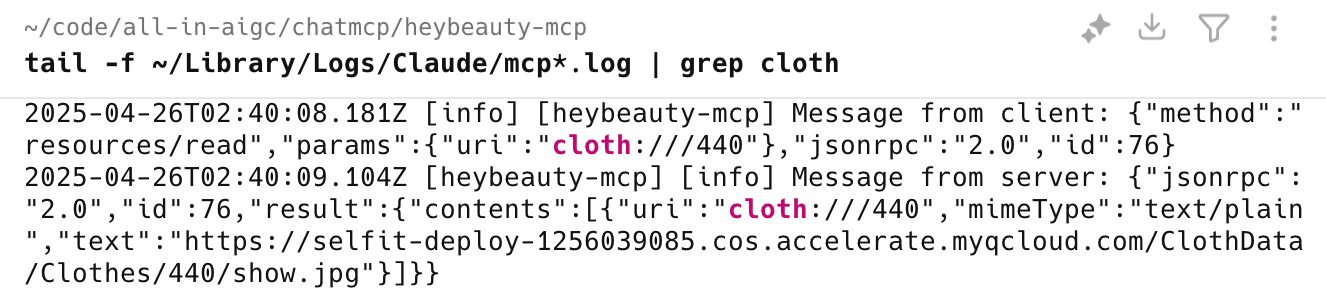
Claude 客户端会在输入框下方显示用户选择的资源,用户点开资源可以查看资源的内容。在这个场景里,资源的内容就是 HeyBeauty MCP 服务器返回的一件衣服的图片地址。
通过上面的示例,我们大致了解了,在大模型客户端(Claude)中,获取 MCP 资源列表以及用户选择资源、查看资源的流程。
接下来我们继续实现 HeyBeauty MCP 服务器的业务逻辑。
- 实现试衣的逻辑
我们继续完善 src/heybeauty.ts 的逻辑,在 HeyBeautyClient 类里面实现 submitTask 和 queryTask 两个方法,分别调用 HeyBeauyt 的 API 提交试衣任务和查询试衣结果。
- 提交试衣任务
提交试衣任务的逻辑如下,请求的是 HeyBeauty 的异步试衣接口:/api/mcp-vton
请求参数必填用户照片地址和衣服图片地址,选填衣服 ID 和衣服描述,category 参数固定传 1,is_sync: 0 表示这是一个异步任务,接口响应 task_id 作为任务标识,后续可用于查询试衣结果。
async function submitTask({  user_img_url,  cloth_img_url,  cloth_id,  cloth_description,}: {  user_img_url: string;  cloth_img_url: string;  cloth_id?: string;  cloth_description?: string;}) {  try {    if (!user_img_url || !cloth_img_url) {      throw new Error("user_img_url and cloth_img_url are required");    }
    const req = {      user_img_url,      cloth_img_url,      cloth_id,      caption: cloth_description || "",      category: "1",      is_sync: "0",    };    const resp = await fetch(`${this.apiBaseUrl}/mcp-vton`, {      method: "POST",      headers: {        Authorization: `Bearer ${this.apiKey}`,      },      body: JSON.stringify(req),    });
    if (!resp.ok) {      throw new Error("request failed with status " + resp.status);    }
    const { code, message, data } = await resp.json();    if (code !== 0) {      throw new Error(message);    }
return { task_id: data.uuid, created_at: data.created_at, updated_at: data.updated_at, status: data.status, tryon_img_url: data.tryon_img_url || "", }; } catch (error) { throw error; }}- 查询试衣结果
查询试衣结果的实现逻辑如下,用提交试衣任务得到的 task_id 作为请求参数,调用 HeyBeauty 的 /api/get-task-info 查询试衣任务的结果。
接口返回试衣状态:status,其值可能是 success 表示试衣成功,或者是 fail 表示试衣识别,或者是 processing 表示任务正在处理中。
如果试衣成功,会在 tryon_img_url 返回用户试穿衣服的图片地址。
async function queryTask({ task_id }: { task_id: string }) {  try {    const uri = `${this.apiBaseUrl}/get-task-info`;    const req = {      task_uuid: task_id,    };
    const resp = await fetch(uri, {      method: "POST",      headers: {        "Content-Type": "application/json",        Authorization: `Bearer ${this.apiKey}`,      },      body: JSON.stringify(req),    });
    if (!resp.ok) {      throw new Error("request failed with status: " + resp.status);    }
    const { code, message, data } = await resp.json();
    if (code !== 0) {      throw new Error(message);    }
return { task_id: task_id, created_at: data.created_at, updated_at: data.updated_at, status: data.status, tryon_img_url: data.tryon_img_url || "", }; } catch (err) { throw err; }}- 定义工具列表
我们在 src/index.ts 里面定义两个工具:submit_tryon_task、query_tryon_task,分别对应着 HeyBeautyClient 里实现的 submitTask 和 queryTask 方法:
/** * Handler that lists available tools. * Exposes a single "submit_tryon_task" tool that lets clients submit a tryon task. * Exposes a single "query_tryon_task" tool that lets clients query a tryon task. */server.setRequestHandler(ListToolsRequestSchema, async () => { return { tools: [ { name: "submit_tryon_task", description: "Submit a tryon task with user image url and cloth image url", inputSchema: { type: "object", properties: { user_img_url: { type: "string", description: "User image url, should be a url of a picture", }, cloth_img_url: { type: "string", description: "Cloth image url, should be a url of a picture, user input or get from the selected cloth resource", }, cloth_id: { type: "string", description: "Cloth id, get from the selected cloth resource", }, cloth_description: { type: "string", description: "Cloth description, user input or get from the selected cloth resource", }, }, required: ["user_img_url", "cloth_img_url"], }, }, { name: "query_tryon_task", description: "Query a tryon task with task id", inputSchema: { type: "object", properties: { task_id: { type: "string", description: "Task id, get from the submit_tryon_task tool", }, }, required: ["task_id"], }, }, ], };});通过调试控制台可以获取到 HeyBeauty MCP 服务器定义的工具列表,如图所示:
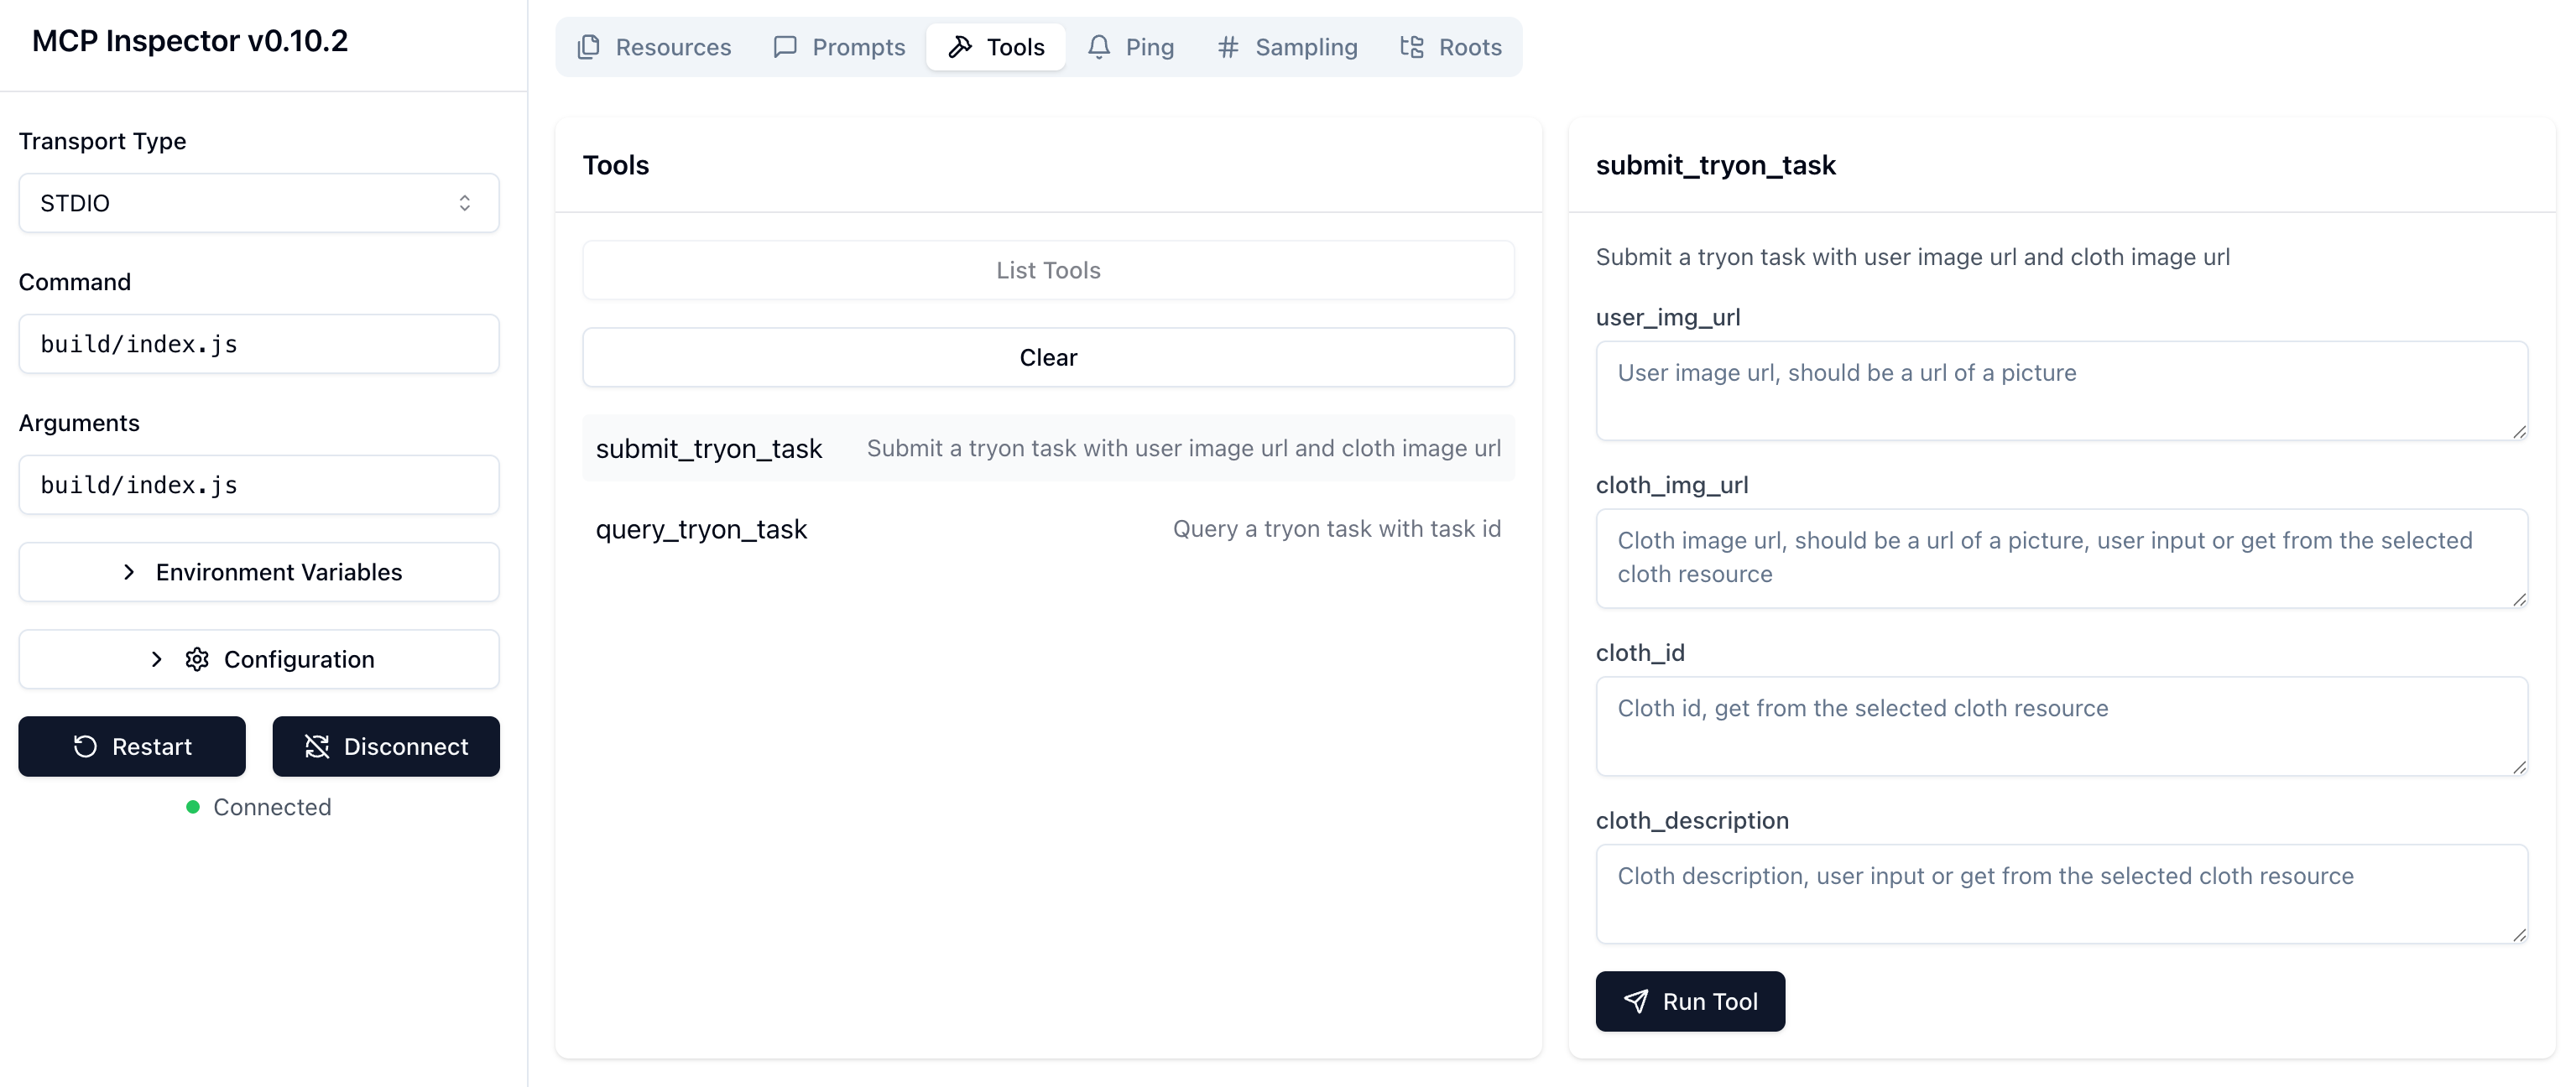
图:调试面板获取工具列表
- 实现工具逻辑
在 src/index.ts 中实现调用工具的逻辑:
- submit_tryon_task
接到 submit_tryon_task 工具调用请求时,从请求参数中读取用户照片地址、衣服图片地址、衣服 ID、衣服描述等信息,通过 HeyBeautyClient 调用 submitTask 方法,提交试衣任务,得到试衣任务的 task_id
- query_tryon_task
接到 query_tryon_task 工具调用请求时,从请求参数中读取 task_id,调用 HeyBeautyClient 的 queryTask 方法,查询试衣结果。
/** * Handler for the submit_tryon_task and query_tryon_task tools. * Submits a tryon task with the provided user image url, cloth image url, cloth id and cloth description, and returns success message. * Queries a tryon task with the provided task id, and returns the task result. */server.setRequestHandler(CallToolRequestSchema, async (request) => {  try {    const apiKey = "cb829660-beed-4ba9-b6c2-f9236a38a6c5";    const client = new HeyBeautyClient({ apiKey });
    switch (request.params.name) {      case "submit_tryon_task": {        const user_img_url = String(request.params.arguments?.user_img_url);        const cloth_img_url = String(request.params.arguments?.cloth_img_url);        const cloth_id = String(request.params.arguments?.cloth_id);        const cloth_description = String(          request.params.arguments?.cloth_description        );
        if (!user_img_url) {          throw new Error("user image is required");        }
        if (!cloth_img_url) {          throw new Error("cloth image is required");        }
        const res = await client.submitTask({          user_img_url,          cloth_img_url,          cloth_id,          cloth_description,        });
        return {          content: [            {              type: "text",              text: JSON.stringify(res),            },          ],        };      }
      case "query_tryon_task": {        const task_id = String(request.params.arguments?.task_id);        if (!task_id) {          throw new Error("task id is required");        }
        const res = await client.queryTask({ task_id });        return {          content: [            {              type: "text",              text: JSON.stringify(res),            },          ],        };      }
default: throw new Error("Unknown tool"); } } catch (error: any) { throw new Error("call tool failed: " + error.message); }});- 调试工具
- 调试
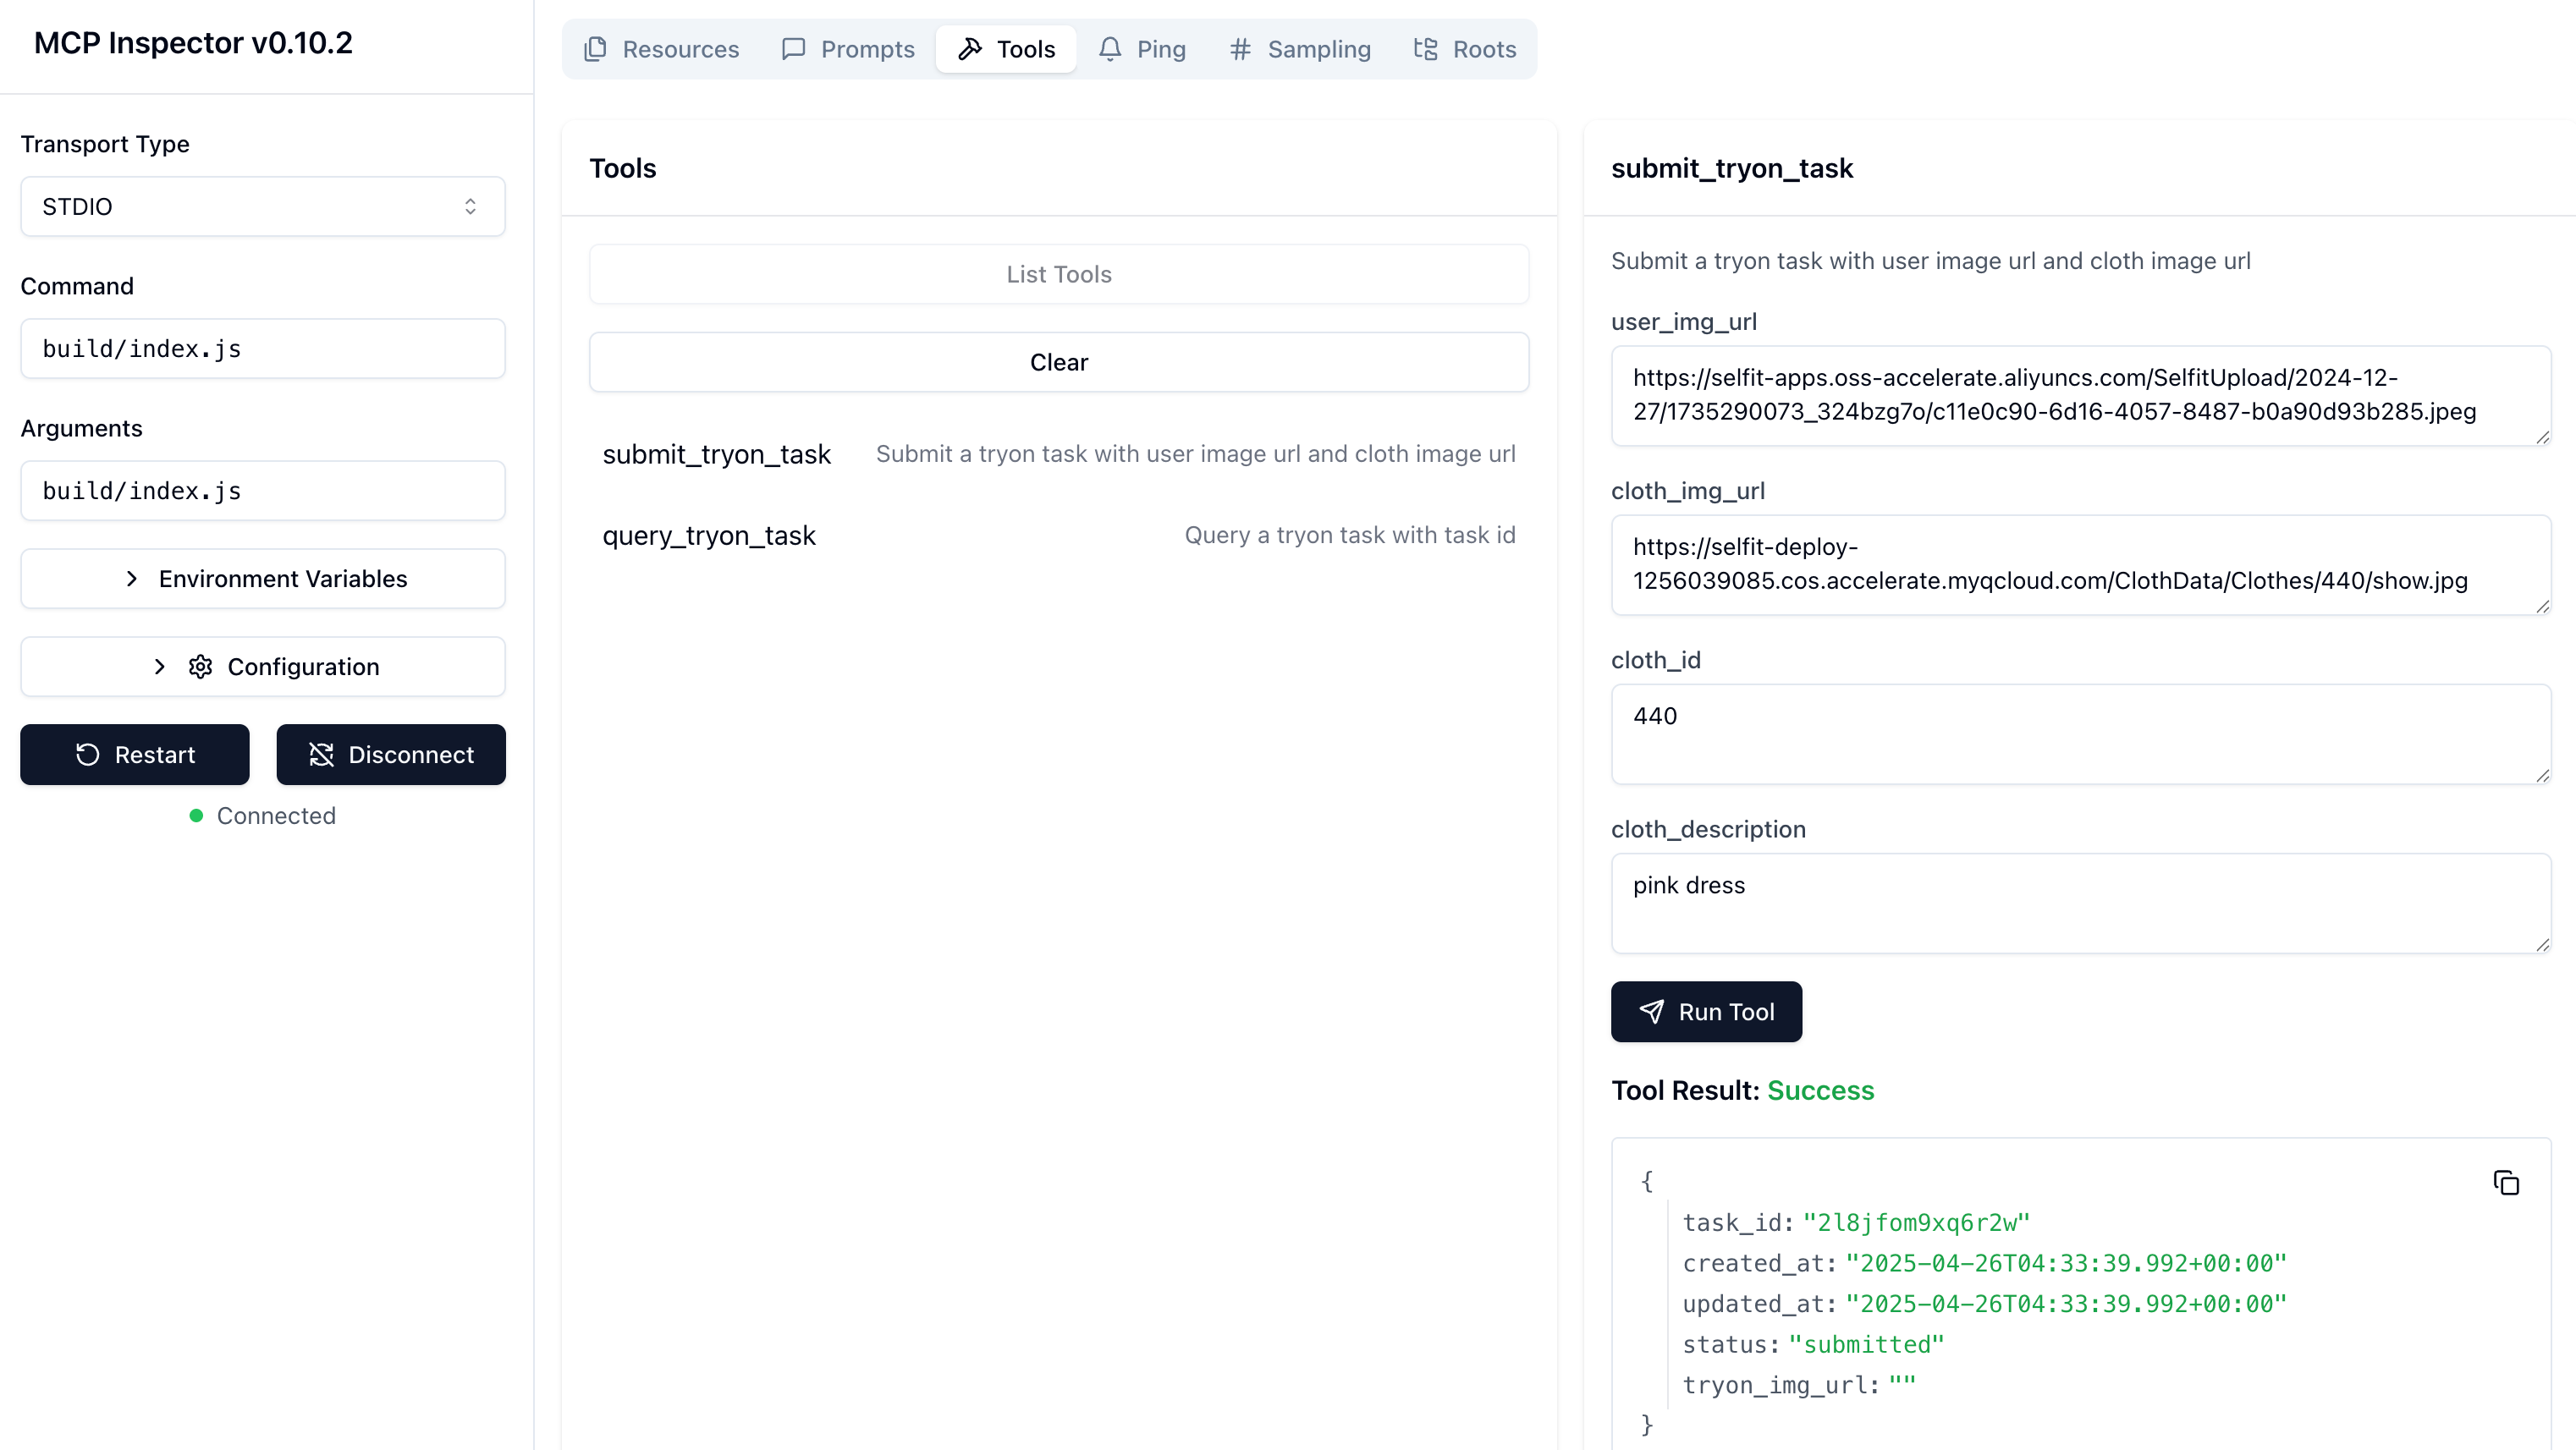
submit_tryon_task接口
在调试面板,输入请求参数,对 submit_tryon_task 工具进行调试,工具响应成功会返回试衣任务的 task_id
- 调试
query_tryon_task接口
在调试面板,输入请求参数,对 query_tryon_task 工具进行调试,工具响应成功会返回任务的结果信息。
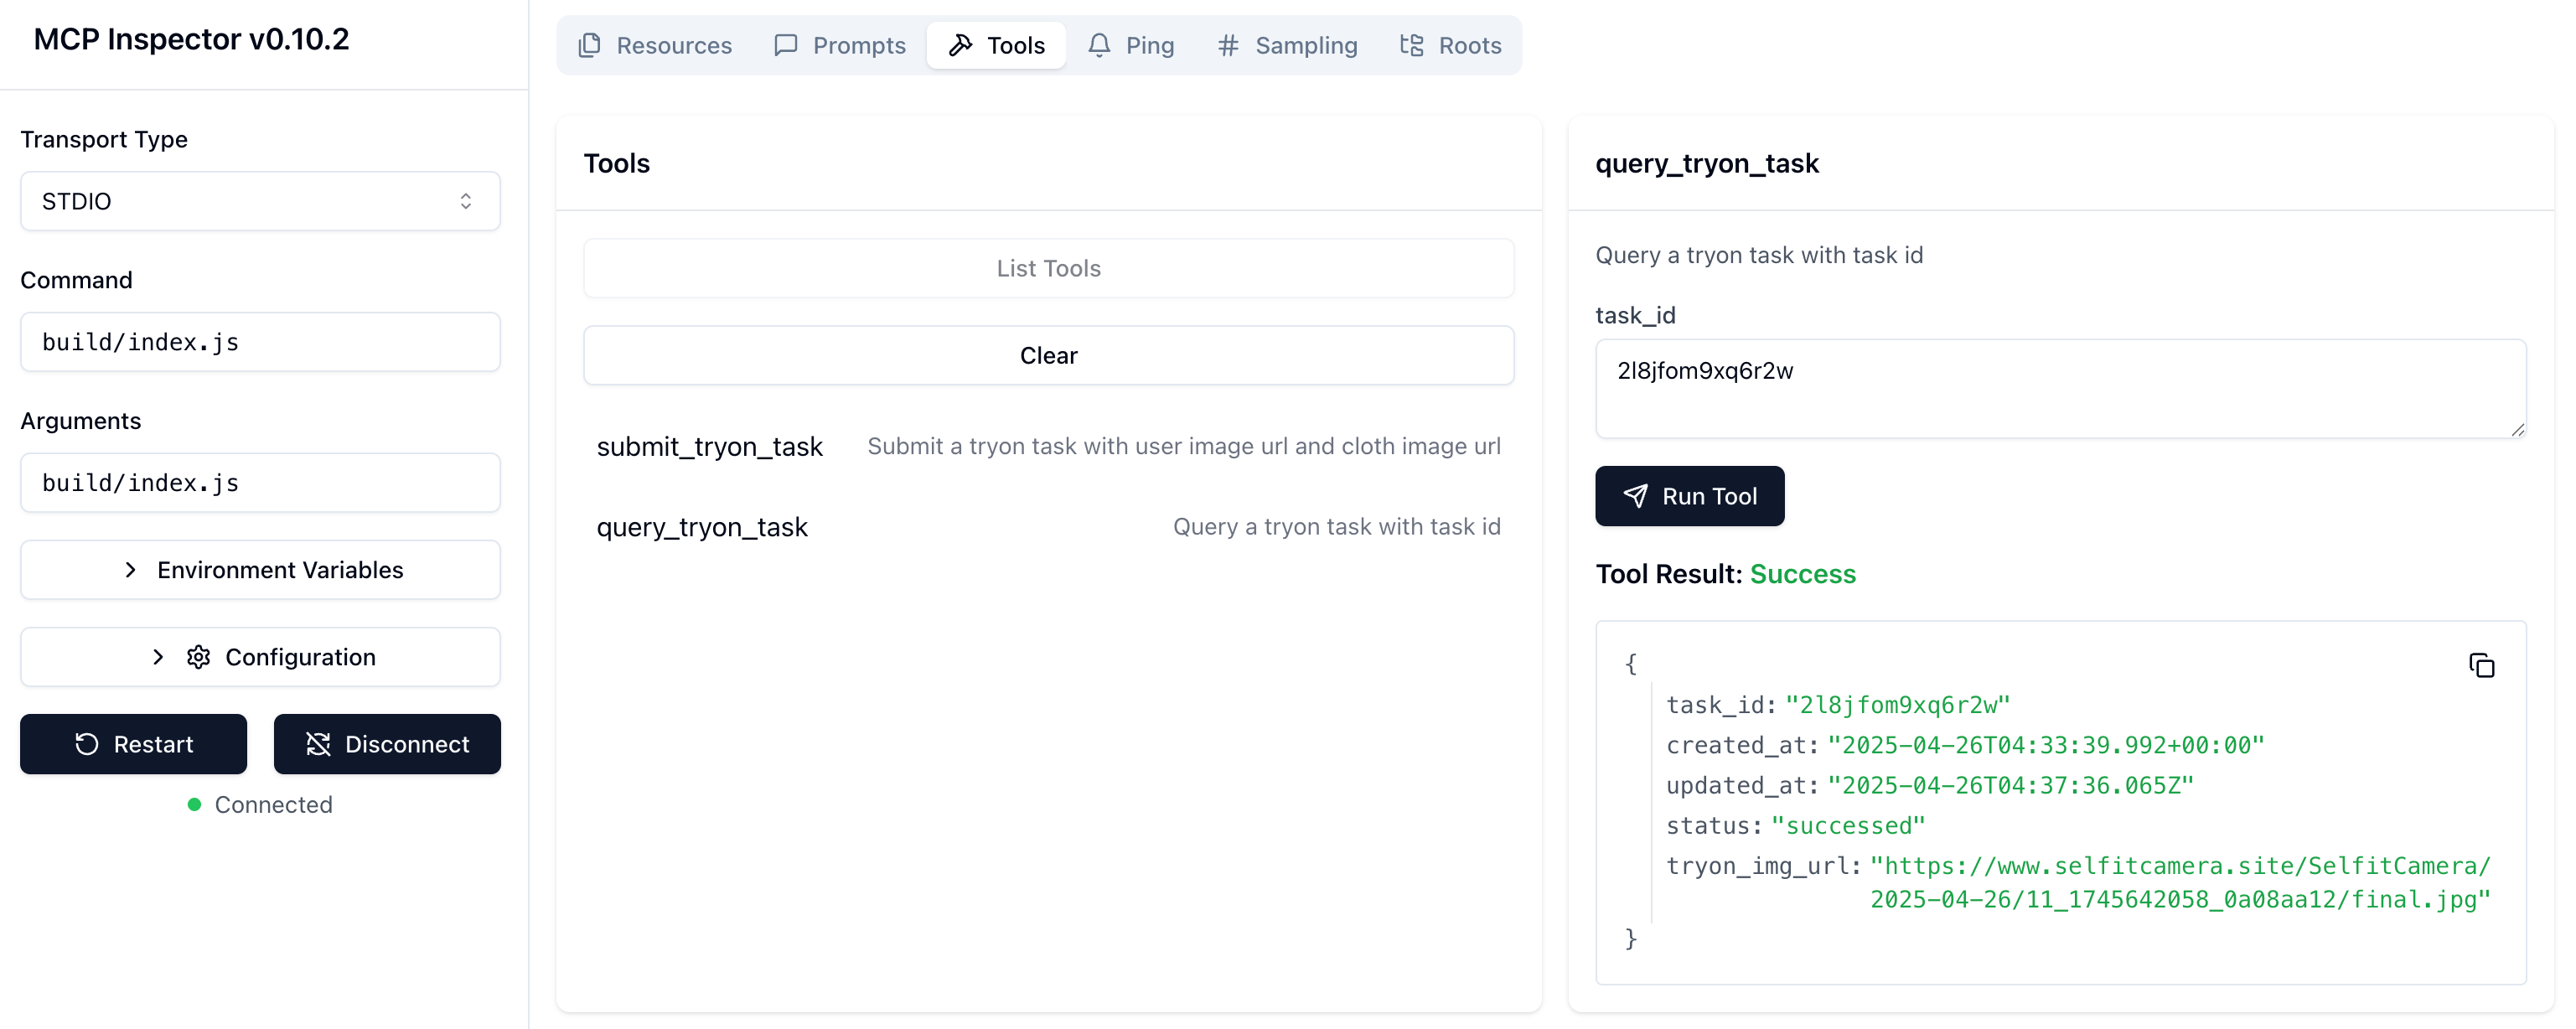
返回的任务 status: successed 表示试衣任务成功,tryon_img_url 是用户试穿衣服后的照片地址。
- 在大模型客户端测试
重启 Claude 客户端,选择一张衣服图片,输入一张照片地址,在输入框写明试衣需求:
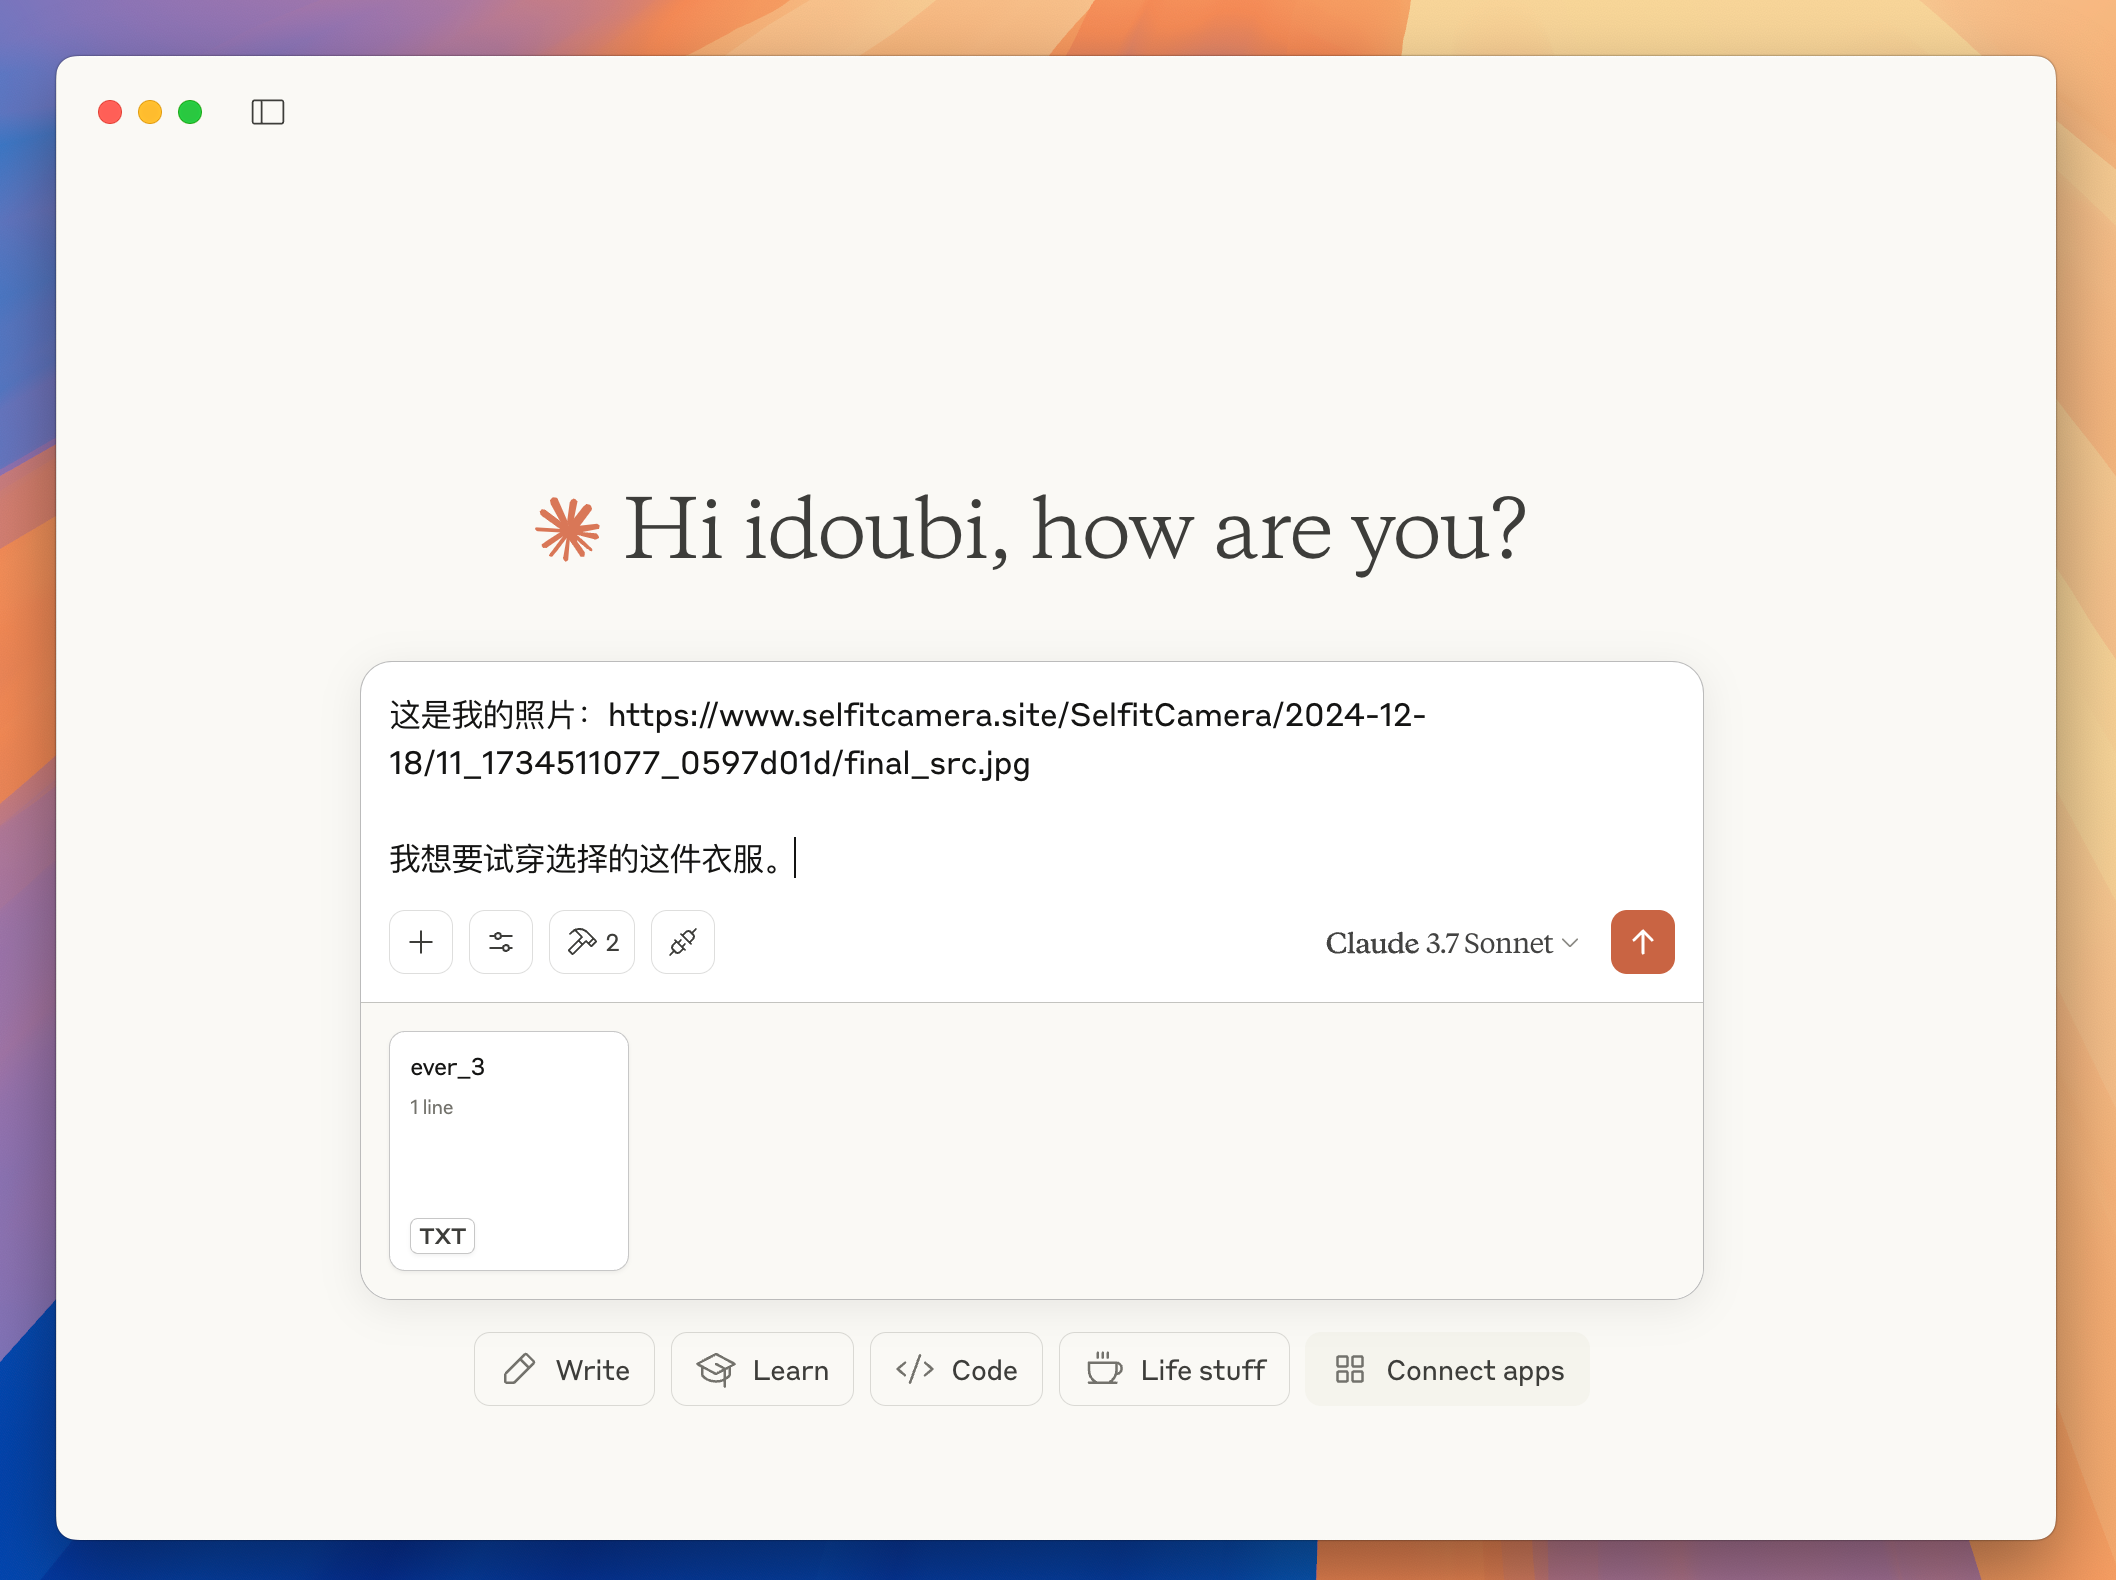
Claude 客户端解析用户选择的图片地址和输入的内容,请求大模型调度,大模型返回要调用的工具名称和请求参数,客户端调用 HeyBeauty MCP 服务器的 submit_tryon_task 工具,得到响应的 task_id,表明试衣任务已经成功创建。
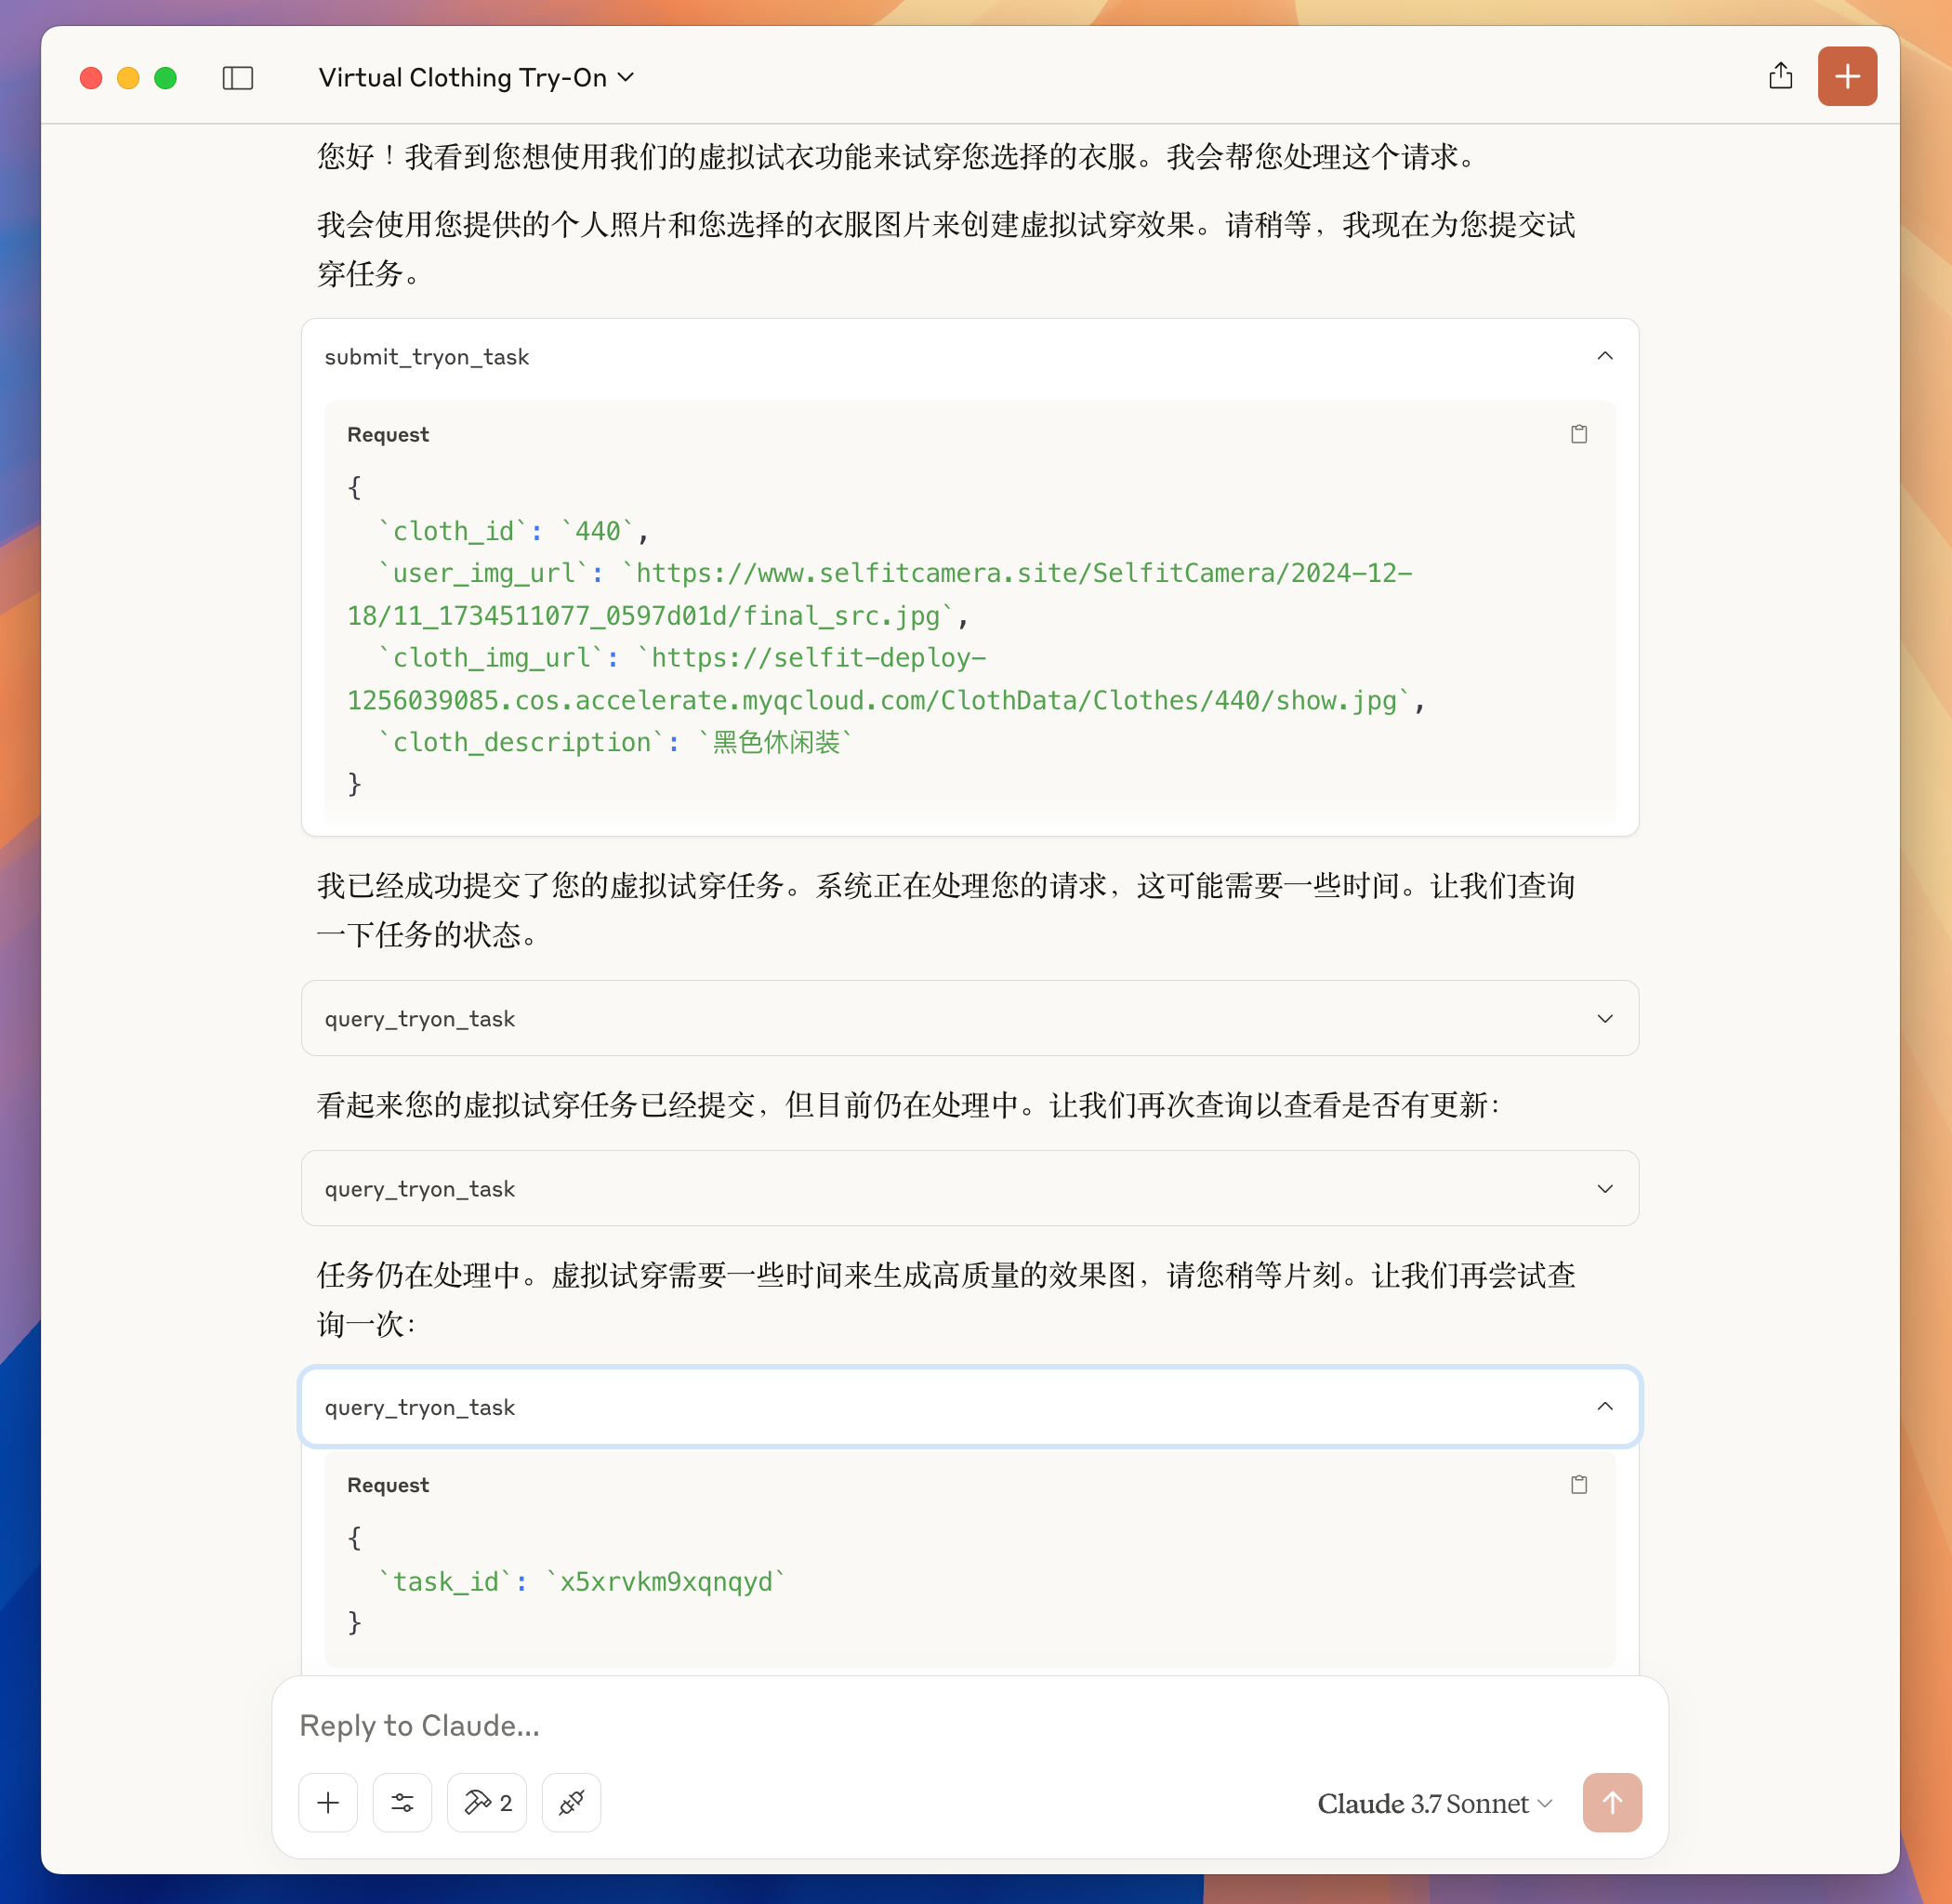
接下来,继续由 Claude 客户端请求大模型调度,根据大模型的调度指示,调用 HeyBeauty MCP 服务器的 query_tryon_task 工具,查询试衣任务结果。
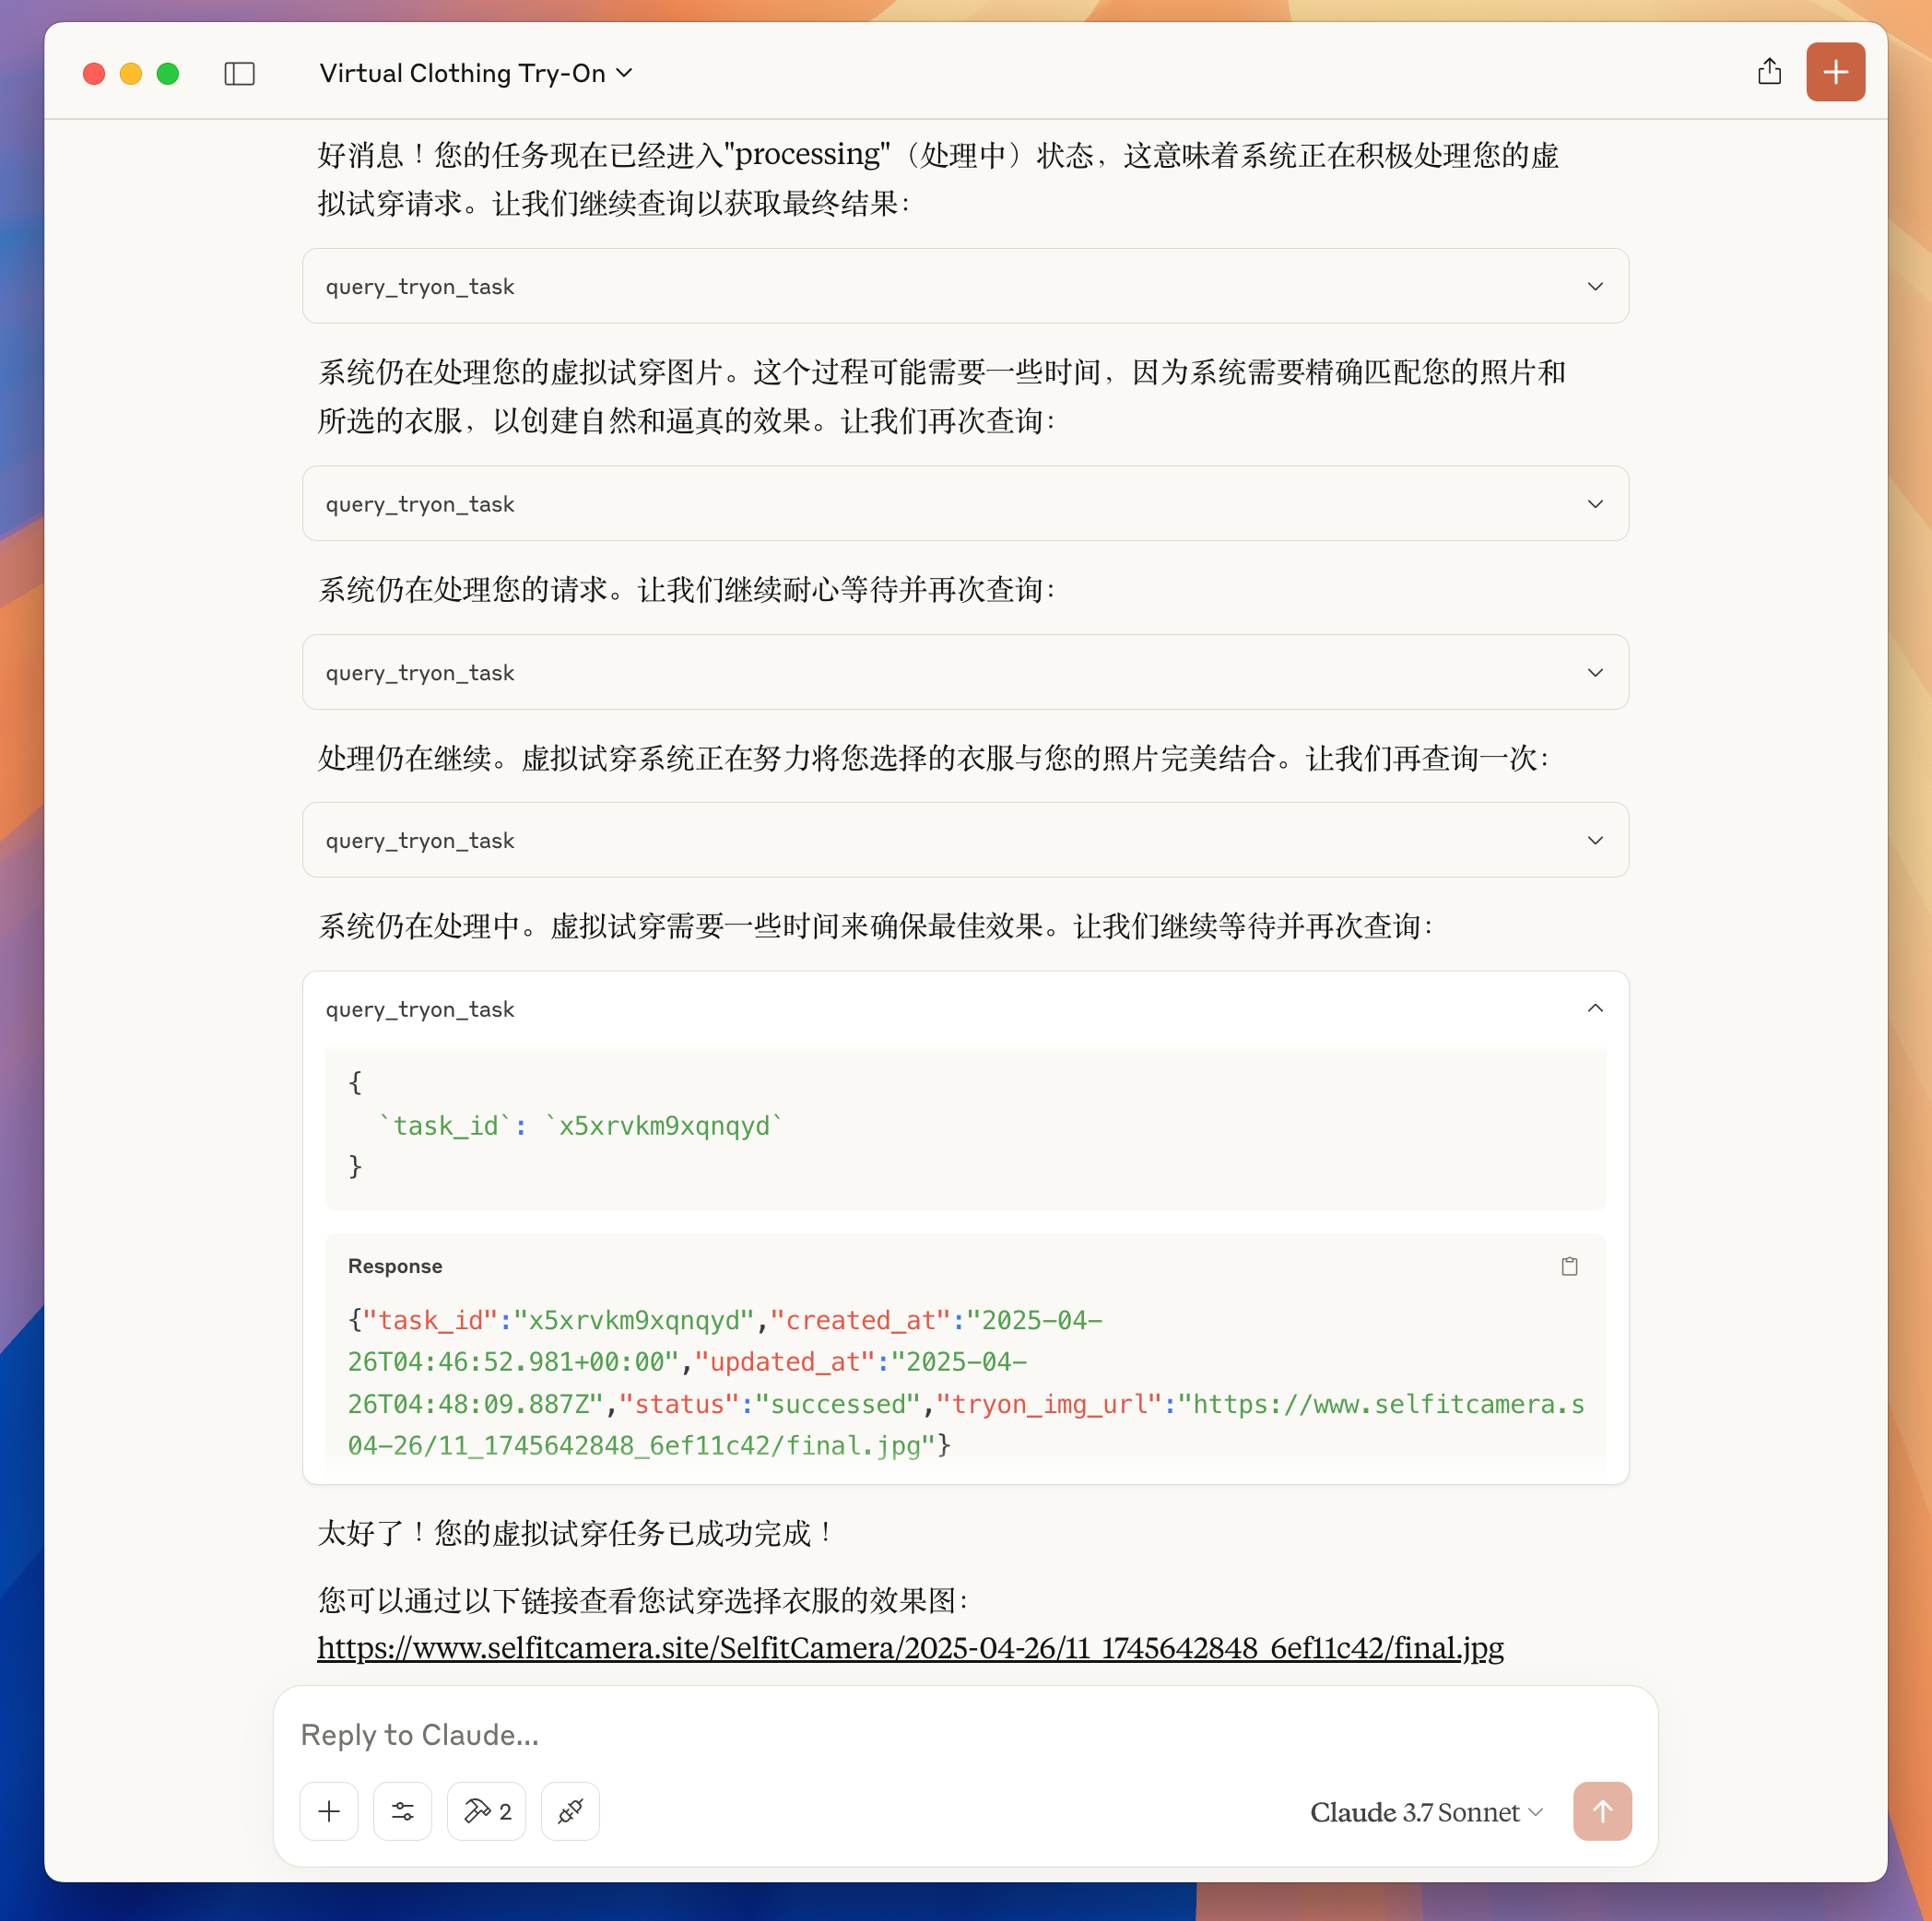
当查到的任务状态为 status: successed 时候,不再请求查询任务工具。而是由大模型根据查询试衣任务的结果,回复最终的试衣效果图给用户。
用户打开链接即可看到试衣效果图。通过一次对话完成了试穿衣服的需求。
我把这个任务,用户输入的图片、选择的衣服图片和最终试衣的效果图片,放在了同一张图里面,更加直观的展示试衣的效果,如图所示:

图:HeyBeauty 试衣效果展示
至此,这个 HeyBeauty MCP 服务器的核心功能开发完成。
用户可以在任意支持 resources 的客户端,选择一张衣服图片,再发送一张照片进行试穿。
如果客户端不支持 resource,那就需要用户输入两张图片的地址,比如在 Cursor 使用 HeyBeauty MCP 时,需要这样发送提示:
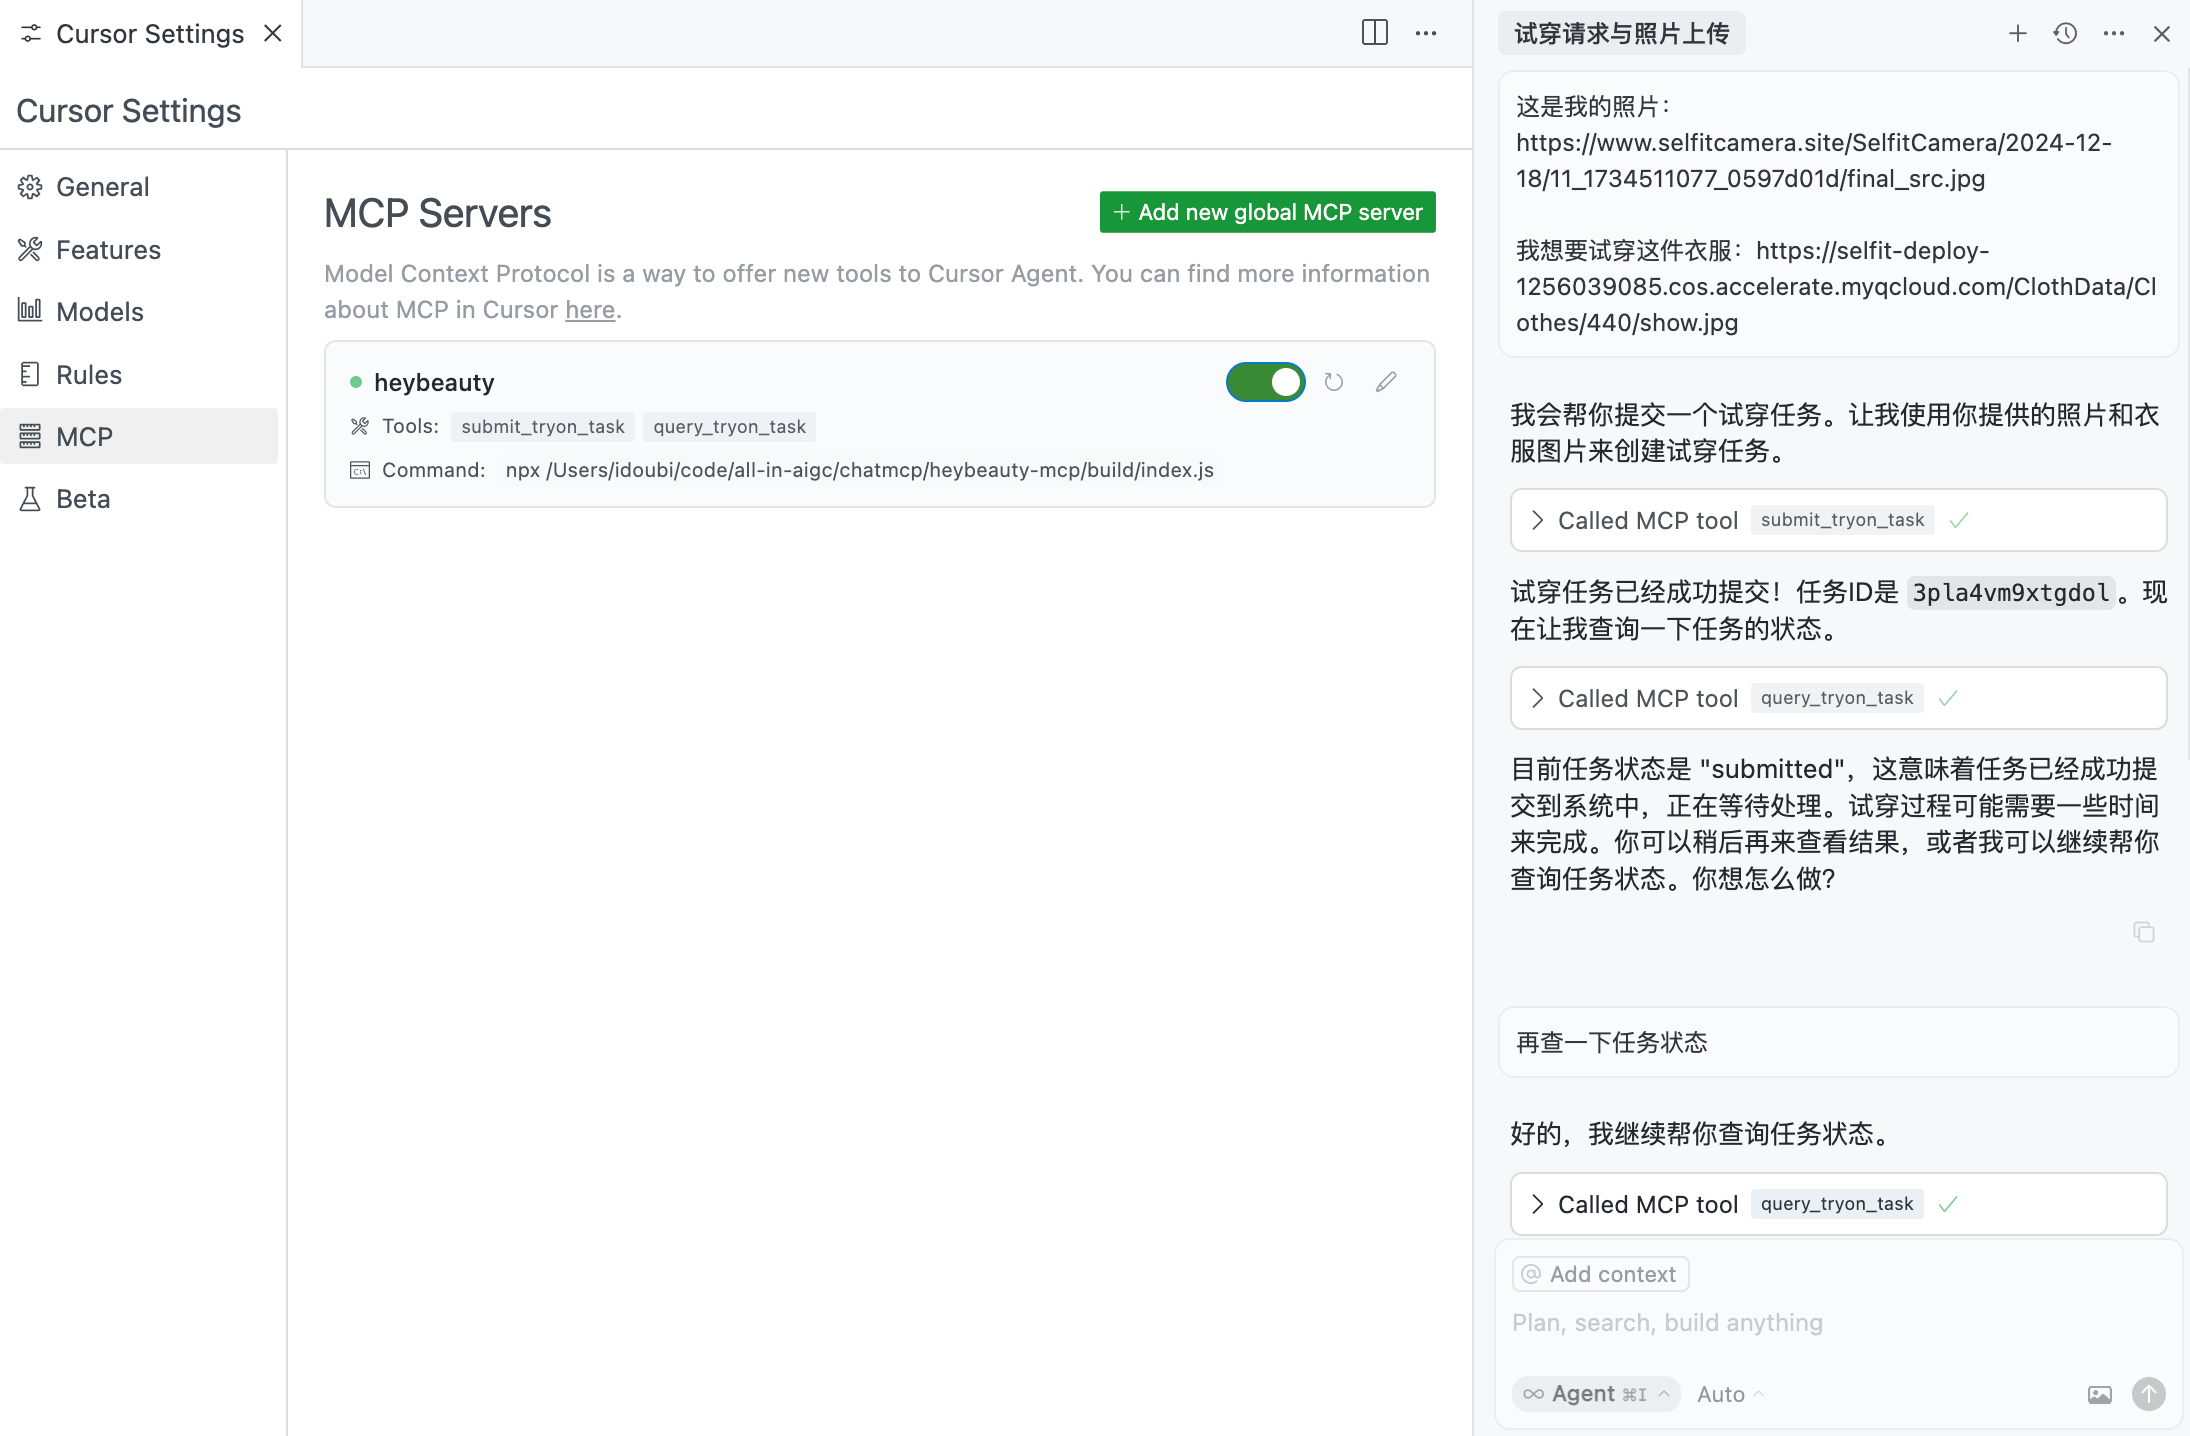
图:在 Cusor 使用 HeyBeauty MCP 服务器
10.为 HeyBeauty MCP 服务器内置提示词
通过前面的步骤,我们实现了这个 HeyBeauty MCP 服务器,可以实现试衣需求。但是用户需要在大模型客户端明确告诉大模型自己要试衣,只发图片地址的情况,大模型可能不会调度 HeyBeauty MCP 服务器。另外,在提交试衣任务成功之后,如何轮询试衣任务状态,以及多久轮询一次,不同的模型调度结果会有比较大的差别。
我们可以在 HeyBeauty MCP 服务器通过提示词模板,来提高 HeyBeauty MCP 服务器的调度准确性,明确告知大模型查询试衣任务的调度频率,减少不必要的资源消耗。
修改 src/index.ts 中返回提示词列表和获取提示词内容的方法,自定义一个 tryon_cloth 的提示词模板,指导大模型在接到用户发送的图片地址后,自动调度 HeyBeauty MCP 服务器的试衣工具。
/** * Handler that lists available prompts. * Exposes a single "tryon_cloth" prompt that tryon with user uploaded image and cloth image. */server.setRequestHandler(ListPromptsRequestSchema, async () => { return { prompts: [ { name: "tryon_cloth", description: "Tryon with user image and cloth image", }, ], };});
/** * Handler for the tryon_cloth prompt. * Returns a prompt that requests tryon with user image and cloth image. */server.setRequestHandler(GetPromptRequestSchema, async (request) => { if (request.params.name !== "tryon_cloth") { throw new Error("Unknown prompt"); }
return { messages: [ { role: "user", content: { type: "text", text: `You are a helpful assistant that helps users try on clothes virtually. When a user provides their photo URL and either:1. A clothing image URL they want to try on, or2. Selects a clothing item from the available resources
Here's how to handle each case:
1. If the user provides their own clothing image URL: - Use the submit_tryon_task tool with: - user_img_url: The URL of the user's photo - cloth_img_url: The URL of the clothing image provided by the user - cloth_id and cloth_description can be left empty
2. If the user selects a clothing item from resources: - Use the submit_tryon_task tool with: - user_img_url: The URL of the user's photo - cloth_img_url: The URL from the selected cloth resource - cloth_id: The ID from the selected cloth resource - cloth_description: The description from the selected cloth resource
After submitting the task:- Get the task_id from the response- Use the query_tryon_task tool every 5 seconds to check the task status- Continue checking until the task status is either "succeeded" or "failed"- If successful, display the tryon_img_url in markdown format: - If failed, inform the user about the failure
Throughout the process:- Keep the user informed about the current status- Be patient and friendly- Handle any errors gracefully
Here is the user's photo URL and either their clothing image URL or the selected clothing item:`, }, }, ], };});在调试面板调用提示词列表,查询提示词的内容,如图所示:

图:调试面板查询提示词
- 在 Claude 客户端使用提示词
重启 Claude 客户端,点击右下角的连接图标,可以看到 HeyBeauty MCP 服务器提供的提示词列表和资源列表。
选择提示词 tryon_cloth 和一张衣服图片,只需要在输入框输入用户照片地址,无需做任何文字说明,大模型即可识别 HeyBeauty MCP 服务器的试衣工具并进行调度:

客户端调用 HeyBeauty MCP 服务器的 submit_tryon_task 工具提交试衣任务之后,拿到 task_id 开始查询任务状态。
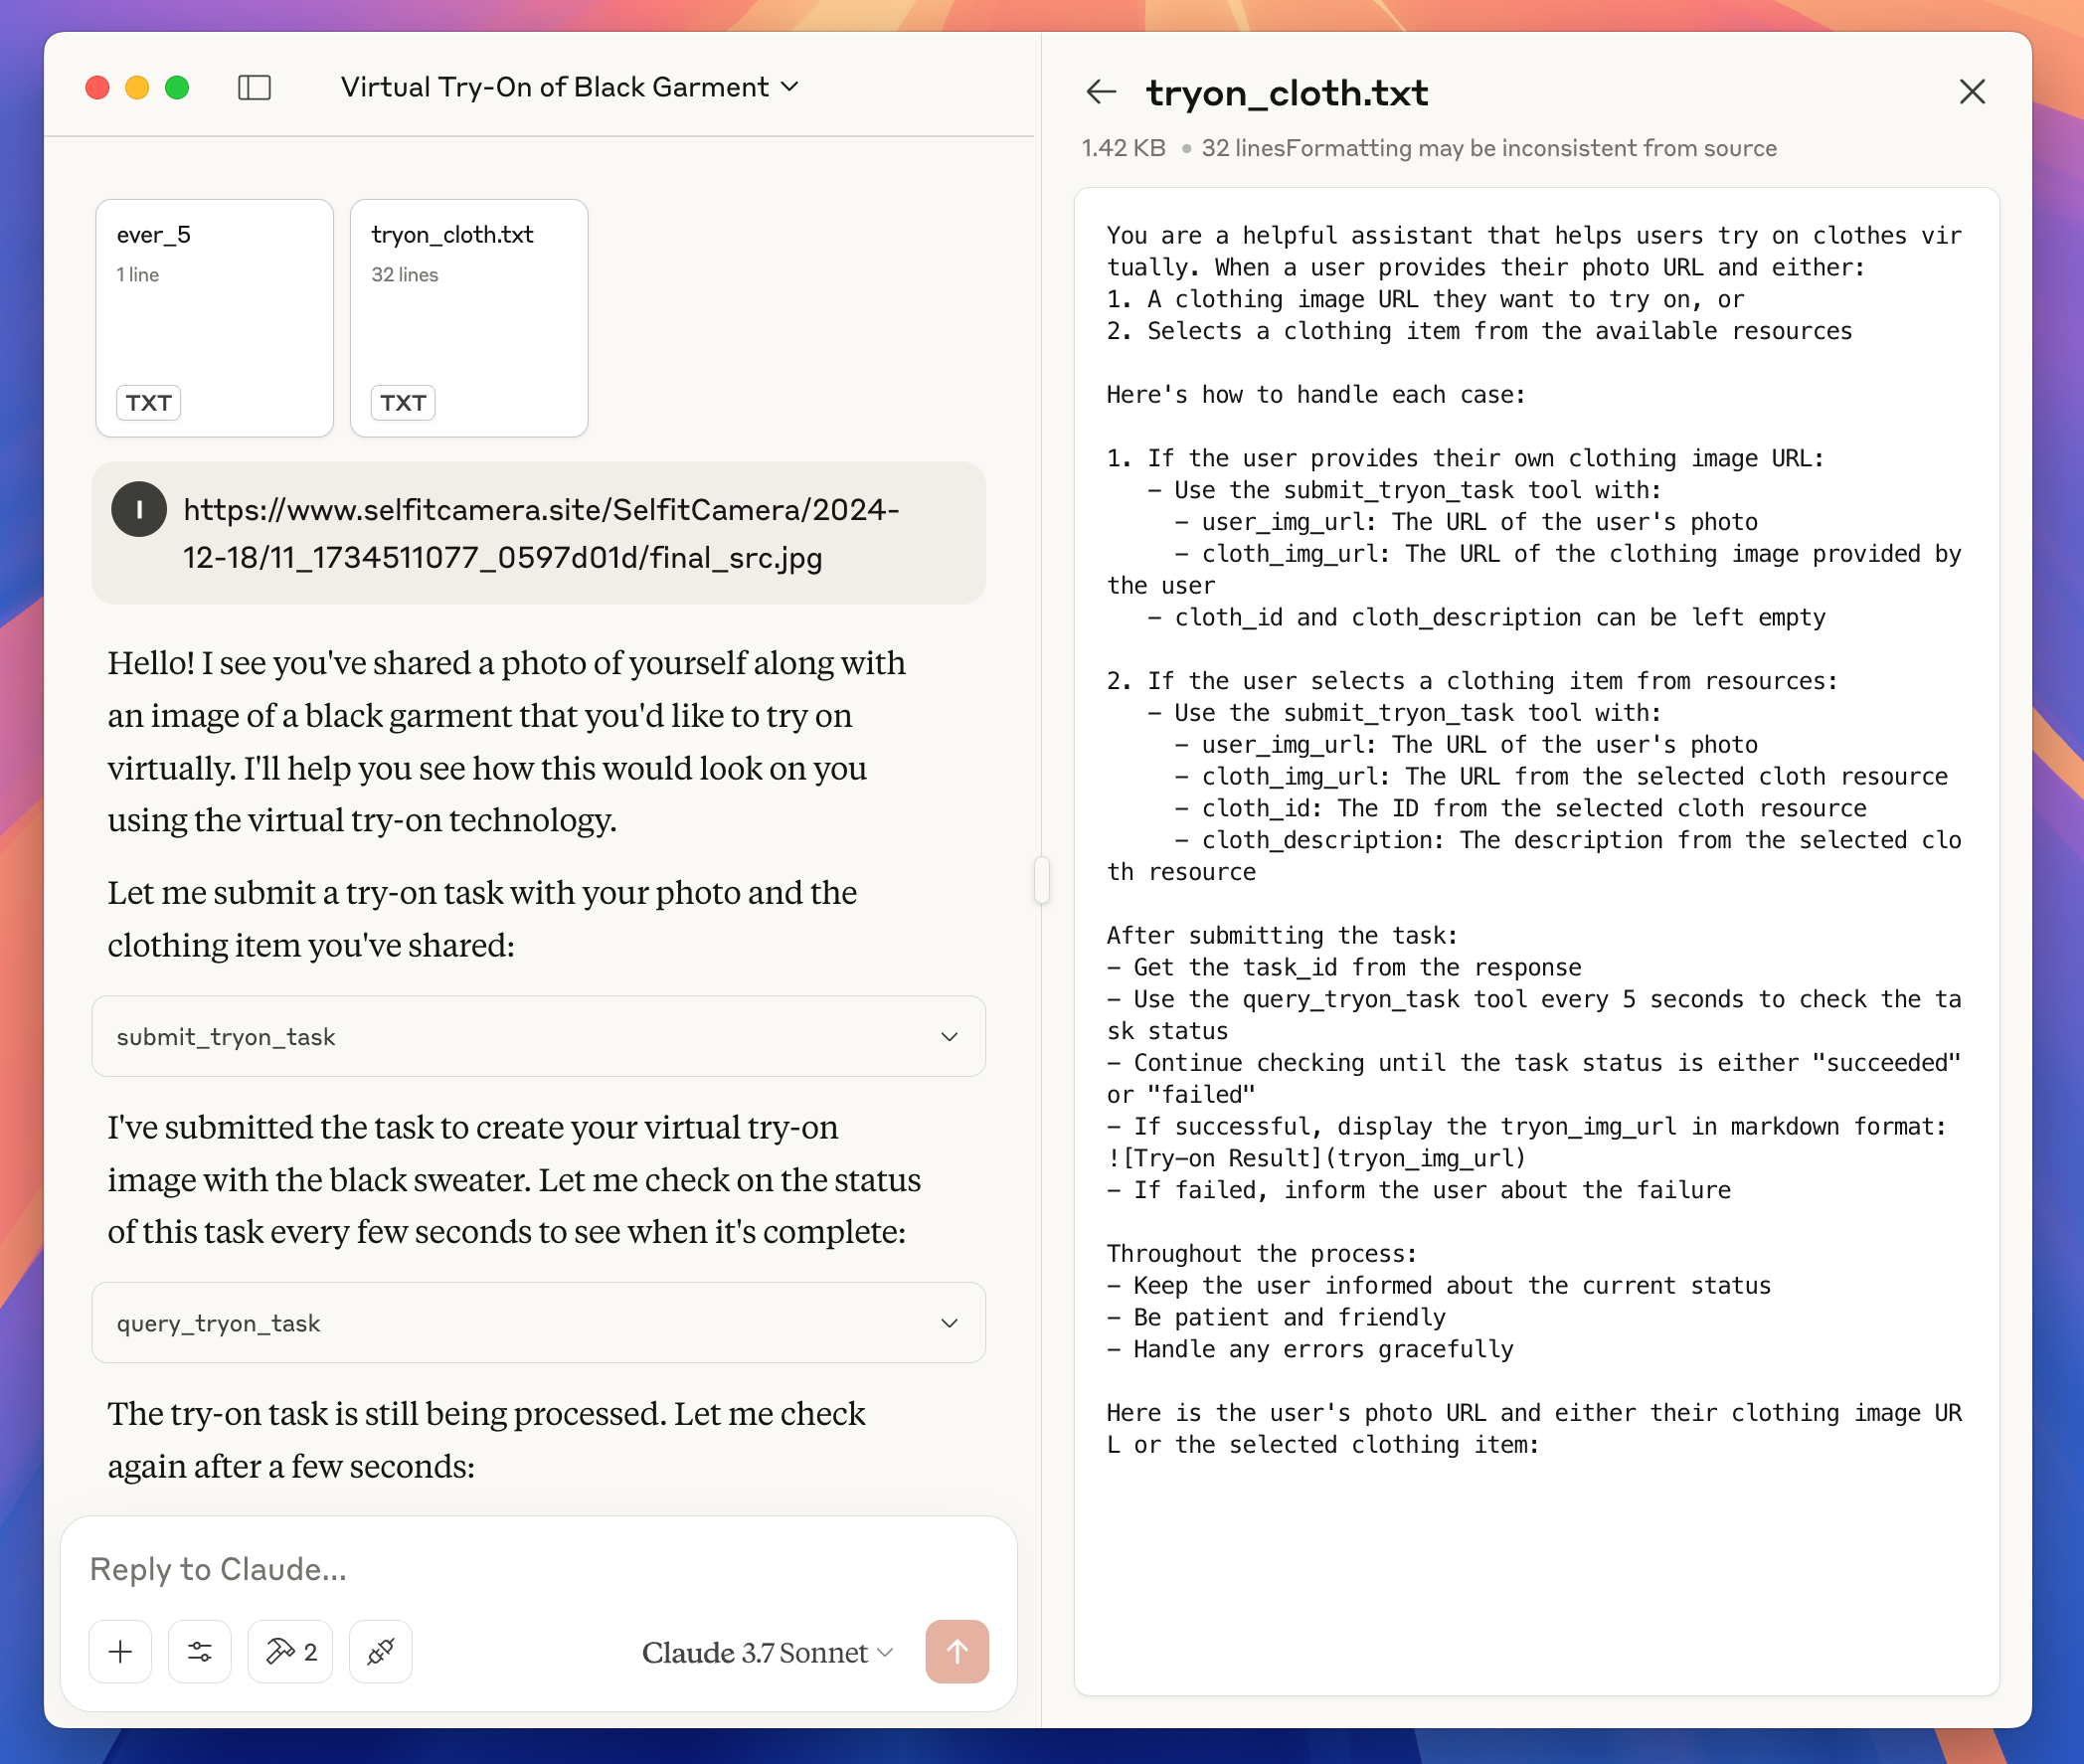
每 5s 调用 query_tryon_task 工具查询一次任务状态,大概查了 10 次之后,得到了试衣结果:

把用户输入的照片地址、选择的衣服图片、试衣结果图片放在一起,可以看到本次试衣任务完成的很不错。用户只是在大模型客户端输入了一张图片地址,选择了一张衣服图片,选择了一个内置的提示词,交互非常简单。

3.4.5 优化 HeyBeauty MCP 服务器
通过前面的步骤,我们已经实现了一个功能完整的 MCP 服务器,帮助用户虚拟试衣。
在发布这个 MCP 服务器之前,我们先检查一遍实现代码,优化一些逻辑。
比如,之前的实现逻辑都是硬编码 HeyBeauty 的 apiKey,我们可以改成从环境变量读取 apiKey:
const apiKey = process.env.HEYBEAUTY_API_KEY || "";if (!apiKey) { throw new Error("HEYBEAUTY_API_KEY is not set");}然后更新项目根目录的 README.md,写入此 MCP 服务器的使用方法。
3.4.6 发布 HeyBeauty MCP 服务器
- 发布到 Github
在 Github 创建一个代码仓库,并提交 HeyBeauty MCP 服务器的代码:
git initgit remote add origin git@github.com:chatmcp/heybeauty-mcp.gitgit add .git commit -m "first version"git push origin main- 发布到 npm
修改 package.json,设置为公有 npm 包
{ "name": "heybeauty-mcp", "version": "0.1.0", "description": "HeyBeauty Virtual TryOn", "private": false, "type": "module", "bin": { "heybeauty-mcp": "./build/index.js" }, "files": ["build"], "scripts": { "build": "tsc && node -e \"require('fs').chmodSync('build/index.js', '755')\"", "prepare": "npm run build", "watch": "tsc --watch", "inspector": "npx @modelcontextprotocol/inspector build/index.js" }, "dependencies": { "@modelcontextprotocol/sdk": "0.6.0" }, "devDependencies": { "@types/node": "^20.11.24", "typescript": "^5.3.3" }}执行命令发布到 npm
npm publish --access=public发布成功后,在 npm 官网可以看到这个包:

然后其他人就可以通过以下配置使用此 MCP 服务器了:
{ "mcpServers": { "heybeauty-mcp": { "command": "npx", "args": ["-y", "heybeauty-mcp"], "env": { "HEYBEAUTY_API_KEY": "xxxxxx" } } }}- 提交到第三方应用市场
可以把这个新开发的 MCP 服务器,提交到 MCP.so 之类第三方应用市场,方便更多人发现和使用。

MCP.so 应用市场展示的 MCP 服务器详情如图所示:
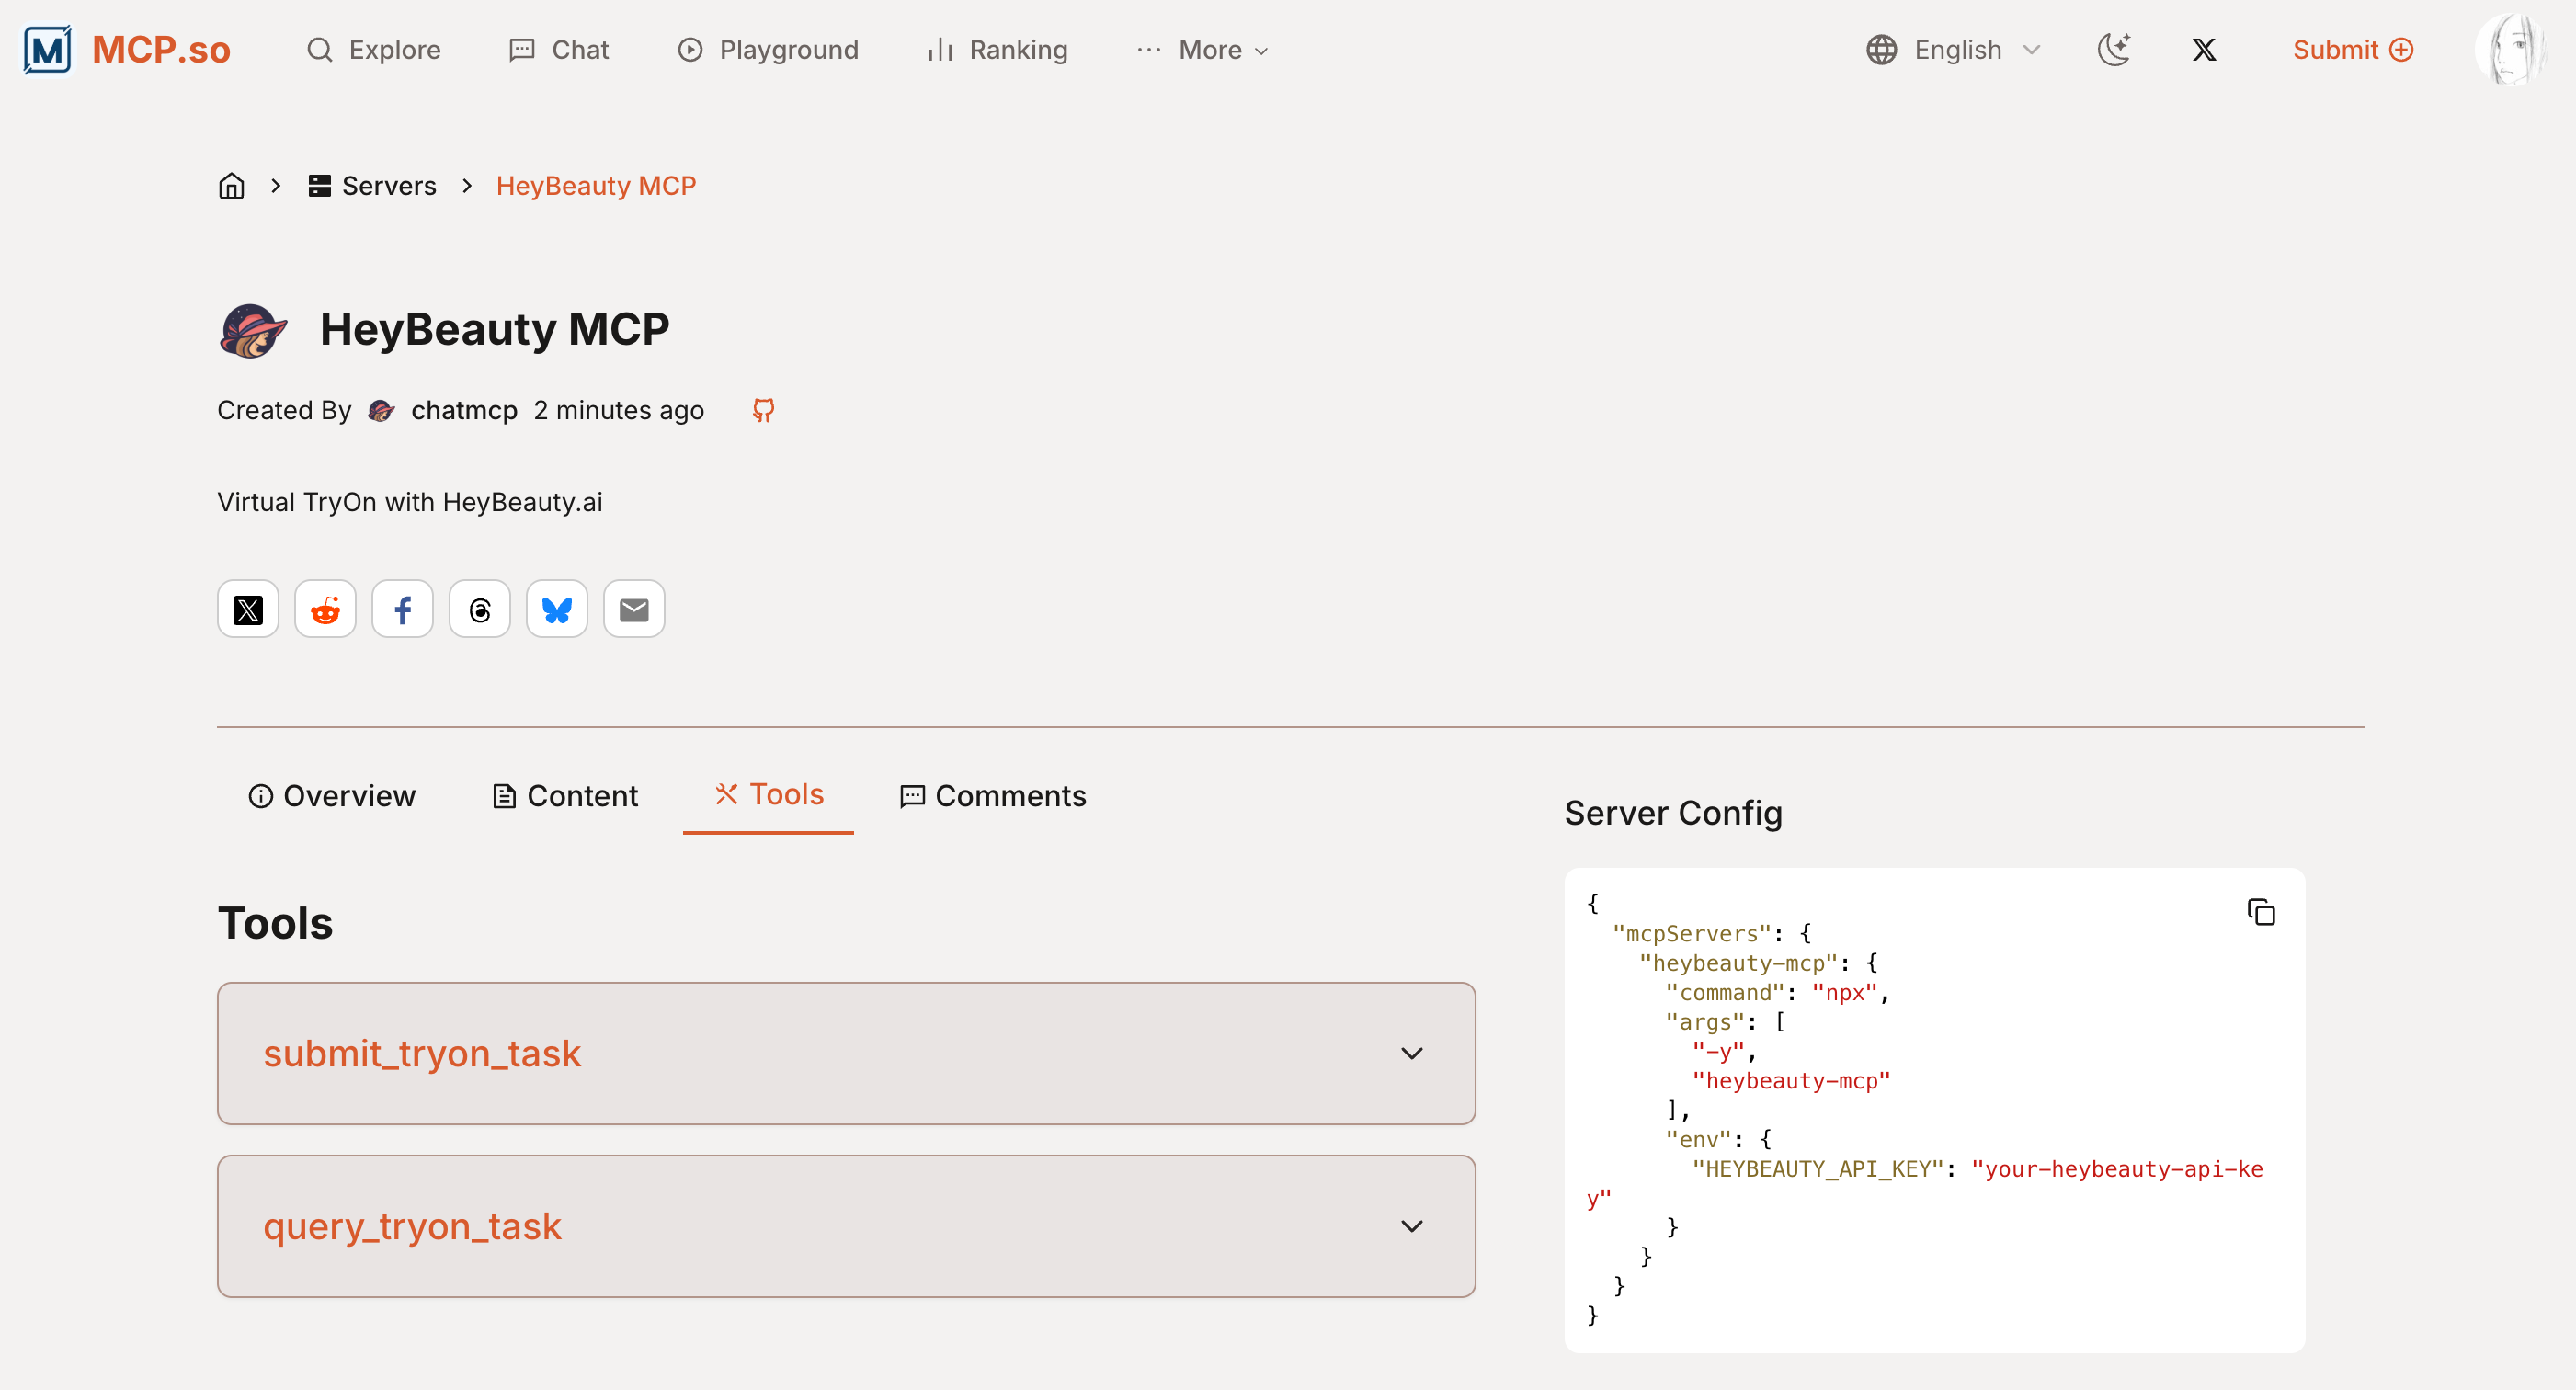
3.4.7 总结
本章节通过开发 HeyBeauty MCP 服务器,展示了如何开发一个支持图片处理的 MCP 服务器。主要实现了以下功能:
- 资源管理
- 通过
ListResources和ReadResource接口,暴露 HeyBeauty 平台的衣服资源 - 支持用户在大模型客户端选择衣服图片进行试衣
- 工具调用
- 实现
submit_tryon_task工具,支持用户提交试衣任务 - 实现
query_tryon_task工具,支持查询试衣任务状态 - 通过工具调用 HeyBeauty API,完成虚拟试衣功能
- 提示词优化
- 内置
tryon_cloth提示词模板 - 指导大模型正确调度试衣工具
- 优化任务查询频率,减少资源消耗
- 发布部署
- 支持通过环境变量配置 API Key
- 发布到 npm 包管理平台
- 提交到第三方应用市场
通过这个案例,我们学习了:
- 如何开发支持图片处理的 MCP 服务器
- 如何通过资源、工具、提示词等能力,优化用户体验
- 如何发布和部署 MCP 服务器,让更多人使用
这个案例展示了 MCP 协议在图片处理场景的应用,为开发者提供了参考。未来可以基于这个案例,开发更多支持图片处理的 MCP 服务器,比如图片编辑、风格迁移等。